This is the full developer documentation for Throughline
# Throughline Documentation
> Draft it with cards. Shape the arc. Write the draft. Deliver the text.
These docs follow the 1.7.0 beta
Throughline 1.7.0 is available as a beta, currently offered alongside the stable 1.6.0 release. These docs describe the beta, including the newest features such as the four Workspaces, better import options, and the AI Assistant.
Draft
Lay your story out as Beat Cards, and cast Characters and Settings into them.
Shape
See each plotline’s emotional Arc as a curve, and your cast as a living map.
Write
A full screenplay and prose editor, with live industry-standard formatting.
Deliver
Export a polished document or an industry-standard screenplay, with a live preview.
Working with Claude, ChatGPT or another AI model? Throughline is ready for it. See [Throughline and AI](/docs/throughline-and-ai/).
# Throughline and AI
> Throughline works with AI whenever you want it to. AI can read, understand and edit a whole story project through a self-describing project file, a three-tool connection for Claude and other AI apps, and an optional assistant with your own provider. The writer stays in control of every change.
Throughline is a story development and screenwriting app for macOS and Windows. It keeps your story as structured data, not as one long block of text, and it explains that data to any AI that reads it. So when you bring AI into your work, a model can see the whole story the way you do, and help with it precisely.
You never have to use AI. Every AI feature is off until you turn it on.
## Three ways to work with AI
[Section titled “Three ways to work with AI”](#three-ways-to-work-with-ai)
| Way | What it is | Where it runs |
| ---------------------------------------------- | ----------------------------------------------------------------------------------------------------------- | --------------------------------------------------- |
| [The .thrl file](/docs/file-format/) | Your project file explains its own structure to any AI model you give it to. | Wherever you send the file |
| [MCP: Connect AI Apps](/docs/connect-ai-apps/) | Claude Desktop, Claude Code, Cursor and other MCP apps read and edit the project open in Throughline, live. | The AI app on your computer and its provider |
| [AI Assistant](/docs/ai-assistant/) | Built-in helpers that summarize, draft and propose arc charges and relationships. | Your own provider, or Ollama fully on your computer |
## Your story as data an AI can understand
[Section titled “Your story as data an AI can understand”](#your-story-as-data-an-ai-can-understand)
A Throughline project is more than a script. It holds the parts of a story that a model needs to reason about it:
* **Beats in story order**, each with a title, a summary, its cast, its setting and its scene text.
* **Structure cards** that say what each part of the story must do, with the Beats that fulfill them.
* **Characters** with a summary, what they want, what they need and the flaw in their way.
* **Relationships** as feelings in both directions, such as “distrusts” or “is indebted to”, and how those feelings change from Beat to Beat.
* **Arcs**: each plotline between two poles you name, with an emotional charge from -1 to 1 at every Beat.
* **Settings**, grouped into piles, and **Sparks**, your inbox of loose ideas.
An AI model that reads this can answer questions such as “where does the second act sag?”, “when does Nina stop trusting her father?” or “which Beats never move the B-story?” from the story itself.
## A file that explains itself
[Section titled “A file that explains itself”](#a-file-that-explains-itself)
Every `.thrl` file carries a guide written for AI readers. It holds the rules of the story model, the story order already worked out, the number the writer sees beside each Beat, and the names behind every id. Give the file to any model you like, and it reads your project correctly without Throughline’s source code or a plugin. See [The .thrl File Format](/docs/file-format/).
Scripts also travel as [Fountain](/docs/import-export/exporting/), the plain-text screenplay format that language models read and write well.
## An AI connection for precise editing
[Section titled “An AI connection for precise editing”](#an-ai-connection-for-precise-editing)
[MCP: Connect AI Apps](/docs/connect-ai-apps/) gives an AI app three tools: read the project, edit it, and open another project. Each tool carries the full rules of the story model, so the AI app knows them from its first call.
* **Names in, names out.** The AI app refers to “Beat 12”, “Nina” or “Inciting Incident”, as you do. When a name fits more than one card, Throughline names the candidates instead of guessing.
* **Whole story, any point in time.** The AI app reads relationships and the cast map at any Beat, and sees when each relationship starts and changes.
* **Precise scene edits.** The AI app can fix one word or one line inside a scene. Your screenplay formatting stays exactly as it is.
* **One batch, one undo step.** The AI app sends its edits in batches. If one edit can’t be made, none of them are. Press Cmd+Z to take a batch back, or ask the AI app to take back its last batch itself.
* **Clean layouts.** Throughline lays out the Constellation and the Arcs by its own rules and reports anything that crowds. Layout never blocks a story edit.
* **You watch it happen.** Every change shows live in the app and saves to your file like your own edits.
## The writer stays in control
[Section titled “The writer stays in control”](#the-writer-stays-in-control)
* **Off by default.** The AI Assistant and the AI connection each have their own switch in **Settings → AI**.
* **Your provider, your choice.** There is no Throughline AI service. Use Claude, ChatGPT, Mistral or any OpenAI-compatible endpoint with your own key, or run Ollama and the AI Assistant keeps every word on your computer.
* **Proposals, not takeovers.** The AI Assistant proposes, and you decide. Every change from a connected AI app can be undone.
* **Your files.** Projects are ordinary files that you save wherever you like. Throughline works offline and needs no account.
## Quick facts
[Section titled “Quick facts”](#quick-facts)
* Platforms: macOS and Windows.
* Project file: `.thrl`, one file per project, with a built-in guide for AI readers.
* AI connection: Model Context Protocol (MCP), three tools, local to your computer, off by default.
* AI Assistant: optional, bring your own provider or run Ollama locally.
* Screenplay import: Fountain, Final Draft (`.fdx`), PDF and plain text.
* Screenplay export: PDF and Fountain. Document export: Markdown, Word and PDF.
* The full manual as plain text for AI tools: [llms-full.txt](/docs/llms-full.txt), or the shorter [llms-small.txt](/docs/llms-small.txt).
# MCP: Connect AI Apps
> Let Claude Desktop, Claude Code, Cursor and other MCP apps read and edit the project open in Throughline, with every change undoable.
Throughline can work with the AI app you already use. Turn on the connection, and Claude Desktop, Claude Code, Cursor or any other app that speaks the Model Context Protocol (MCP) can read your open project and work on it with you: plan Beats, build Characters and Settings, arrange piles, set Arc charges, lay out the Constellation and write scenes.
You watch every change happen live in the app, and you can undo each one.
## Off until you turn it on
[Section titled “Off until you turn it on”](#off-until-you-turn-it-on)
The connection is off by default. Turn it on under **Settings → AI → MCP: Connect AI Apps → Allow connections**. The status line shows when it’s running.
This is separate from the [AI Assistant](/docs/ai-assistant/). You can use either one, both, or neither.
## Connect Claude Desktop
[Section titled “Connect Claude Desktop”](#connect-claude-desktop)
1. Turn on **Allow connections**.
2. Click **Add to Claude Desktop**.
3. Restart Claude Desktop.
Claude now lists Throughline among its tools. Ask it something like “Read my project in Throughline and suggest where the second act sags.”
On a Mac, move Throughline to your Applications folder first and open it from there. Throughline tells you if it needs this.
If **Add to Claude Desktop** can’t find Claude Desktop, click **Copy config**, then open Claude Desktop’s **Settings → Developer → Edit Config** and paste the `Throughline` entry into `mcpServers`.
## Connect Claude Code, Cursor and other apps
[Section titled “Connect Claude Code, Cursor and other apps”](#connect-claude-code-cursor-and-other-apps)
* **Claude Code**: click **Copy Claude Code command** and run it in your terminal.
* **Cursor and other MCP apps**: click **Copy config** and paste it into the app’s MCP settings.
## Permissions
[Section titled “Permissions”](#permissions)
Throughline gives AI apps three tools: one to read the project, one to edit it, and one to open another project. Claude Desktop asks you once for each tool the first time it’s used, so you’ll see at most three prompts.
In Claude Code, you can allow all three at once: run `/permissions` and add the rule `mcp__Throughline`.
## How it works
[Section titled “How it works”](#how-it-works)
* **Throughline must be running.** The AI app talks to the open app, not to your files. If Throughline is closed, the AI app says so.
* **It works on the open project.** The AI app can list your recently opened projects and open another one, the same way you would from the Home screen.
* **Every change is yours to keep or undo.** The AI app sends its edits in batches, and each batch is one undo step. Press Cmd+Z (Ctrl+Z on Windows) to take it back. The AI app can also take back its own last batch, as long as you haven’t edited since. If one edit in a batch can’t be made, Throughline makes none of them. Switching projects clears the undo history, as usual.
* **Layout never blocks your story edits.** If the AI app can’t lay out the Constellation or an Arc cleanly, it gets a warning and keeps the rest of the batch.
* **Changes save like your own edits.** They land in your `.thrl` file through autosave.
* **Your typing wins.** If the AI app writes into the scene you’re typing in, your unsaved typing is kept. Undo brings the AI’s version back if you want it.
## Easy for AI apps to use
[Section titled “Easy for AI apps to use”](#easy-for-ai-apps-to-use)
* **The rules come with the tools.** Each tool explains Throughline’s story model, so the AI app knows how Beats, piles, relationships and Arcs work from its first call.
* **Names in, names out.** The AI app refers to Beats by number or title and to Characters, Settings and Arcs by name, as you do. When a name fits more than one card, Throughline lists the candidates instead of guessing.
* **The whole timeline.** The AI app sees when each relationship starts, how its feelings change and where it ends.
* **Clear results.** Each edit reports what changed, including the feelings it replaced, so the AI app can explain its work to you.
## What the AI app can do
[Section titled “What the AI app can do”](#what-the-ai-app-can-do)
* **Read**: the project overview, Beats in story order, full scene text, Characters and how their relationships change across the story, Settings with their piles, Arcs and charges, Sparks, and the recycling bin.
* **Create and edit**: Beats, Characters, Settings, Sparks, structure cards, project details and relationships. It writes scenes in Fountain for screenplay projects and in prose for rich text projects, and it can fix a single word or line without rewriting the scene. Your formatting stays as it is.
* **Arrange**: move Beats and structure cards, pile and unpile them, reorder Settings and Characters.
* **Recycle and restore**: send cards to the recycling bin and bring them back.
* **Shape**: create Arcs, add or remove Beats, set emotional charges, and space an Arc’s Beats evenly again.
* **Constellation**: lay out the cast by Throughline’s layout rule or move single Characters. It checks that no two Characters or relationship labels cover each other.
## Privacy
[Section titled “Privacy”](#privacy)
The connection stays on your computer. Throughline opens it only to apps running on the same machine, and only while the switch is on.
The AI app you connect is a separate program. What it reads from your project goes to its own AI provider under that app’s terms. For example, Claude Desktop sends it to Anthropic.
Browser-based apps such as claude.ai or ChatGPT on the web can’t reach a desktop app, so they can’t connect.
## Troubleshooting
[Section titled “Troubleshooting”](#troubleshooting)
* **“Throughline is not running, or its MCP connection is off.”** Open Throughline and check that **Allow connections** is on.
* **“Throughline did not answer in time.”** If Throughline’s window is minimized or hidden, bring it to the front and try again.
* **“No project is open.”** Open a project in Throughline, or ask the AI app to open one.
* **“Throughline is asking the writer about a file change.”** Your `.thrl` file changed outside the app. Answer the dialog in Throughline, then try again.
# The .thrl File Format
> The .thrl project file format: one file holding your entire story, saved wherever you choose, with its autosaves right next to it.
`.thrl` is Throughline’s own project format: one file holding everything: Beats, Characters, Settings, Structures, Arcs, Sparks, and even your recycling bin. Every project you work on is a `.thrl` file saved wherever you choose, so your whole project is always portable, shareable, and ready to open on any other Throughline install. See [Projects & Files](/docs/getting-started/projects-and-files/) for how creating, opening, and saving work.
## No lock-in
[Section titled “No lock-in”](#no-lock-in)
Your project already is the file, and it contains all the data of your project.
Need a separate copy to send someone? Use **Save a Copy…**, or export a `.thrl` from the Deliver Workspace.
## Readable by any AI
[Section titled “Readable by any AI”](#readable-by-any-ai)
Every `.thrl` file carries a guide written for AI readers, so your story can be fully understood and processed by an LLM of your choice. The guide holds:
* **The rules of the story model**: how Beats pile under Structure Cards, how relationships and their feelings change from Beat to Beat, what an Arc’s charge means, and how Sparks become cards.
* **The story order**, already worked out, so a model never has to sort the Beats itself.
* **The Beat numbers** you see in the app, so a model talks about “Beat 12” exactly as you do.
* **The names behind every id**, for Characters and Beats.
Throughline writes the guide fresh with every save and ignores it when it opens a file, so it never gets in the way. Old `.thrl` files always open in newer versions of Throughline. See [Throughline and AI](/docs/throughline-and-ai/) for all the ways AI can work with your project.
## Autosaves
[Section titled “Autosaves”](#autosaves)
Throughline keeps regular autosaves of your open project in a folder named `_autosaves`, right next to your `.thrl` file. Pick an interval (5, 10, 15, 30 minutes, 1 or 2 hours, or once a day) and how many to keep, both in **Settings → General → Autosaves**.
Every autosave is itself a normal `.thrl` file: double-click one to open it as its own project. Copies kept because of a decision, such as `(legacy THRL 1.5)` or `(changed elsewhere)`, carry that label in their name and are never deleted automatically.
**Restore from Autosave**, in the project menu, lists your autosaves by time. Restoring keeps your current state in the autosaves folder first, so you can always go back. See [Autosaves](/docs/getting-started/projects-and-files/#autosaves) for the details.
# AI Assistant
> Throughline's optional AI writing assistant: off by default, bring your own provider, run Ollama locally, and every result is a proposal you approve.
Throughline is not an “AI writes your story” tool. If you choose to turn AI on in the settings, the assistant does chores: it rephrases passages, reads what you already wrote and fills in the beat summary, proposes emotional charges in Arcs, and other helpful tasks.
## Off until you say otherwise
[Section titled “Off until you say otherwise”](#off-until-you-say-otherwise)
The AI Assistant is off by default. You turn it on under **Settings → AI → AI Assistant → Enable AI Assistant**. Nothing is sent anywhere until you’ve enabled it *and* invoked an action yourself, and when you do, only the text that action works on is sent.
## Bring your own provider
[Section titled “Bring your own provider”](#bring-your-own-provider)
There’s no Throughline AI service and no bundled model. You point the app at a provider you control.
* **Ollama, running on your own computer**: private and free. Your writing never leaves the machine. Throughline detects a local Ollama install and lists the models you’ve downloaded.
* **Any OpenAI-compatible endpoint**: [OpenRouter](https://openrouter.ai/api/v1), for example, or anything else that speaks the same API, with your own API key. The key is stored only in your local Throughline settings file. You can use ChatGPT, Claude, Mistral (this one works very well!) or any custom endpoint that’s compatible.
Use the **Test connection** button to check if it’s set up correctly.
The AI writes in your project’s screenplay language, English or German, set in Project Details. If you’re writing in a different language, it will also try its best!
## In the Write Workspace
[Section titled “In the Write Workspace”](#in-the-write-workspace)
**Draft at the cursor.** Describe what should happen next, or how the selected passage should change, and Throughline drafts it in place, streaming as it writes. If the new pages give dialogue to Characters who weren’t in the scene, they’re cast into it automatically.
**Draft scene from summary.** Turns a Beat’s summary into a first pass at the scene, so you have something to argue with instead of a blank page.
## In the Draft Workspace card editors
[Section titled “In the Draft Workspace card editors”](#in-the-draft-workspace-card-editors)
**Derive summary from script** and **Derive title from script**, in the Beat editor, read what you actually wrote and write the card back’s summary or the Beat’s title from it. Useful when the scene drifted from the plan and the card no longer matches it.
**Derive character from story**, in the Character editor, fills in a Character’s details from how they behave across the story.
**Derive description from scenes**, in the Setting editor, writes a Setting’s description from the scenes that happen there.
**Derive logline from story**, in Project Details, does the same job for the project as a whole.
## In the Shape Workspace
[Section titled “In the Shape Workspace”](#in-the-shape-workspace)
**Infer relationships from beat**, in the Constellation, proposes how your Characters feel about each other in a given Beat.
**Infer arc from beats** reads each Beat in an Arc and proposes emotional charges for the whole plotline. If some Beats have no summary to read, it writes those first.
## Working with Claude or another AI app
[Section titled “Working with Claude or another AI app”](#working-with-claude-or-another-ai-app)
To let an outside AI app such as Claude Desktop read and edit your project, see [MCP: Connect AI Apps](/docs/connect-ai-apps/). For an overview of everything Throughline does with AI, see [Throughline and AI](/docs/throughline-and-ai/).
# Community & Feedback
> Where to send a bug report, a feature idea, or just say hello.
Throughline is built by writers, not a faceless company, which means feedback reaches someone who can act on it.
## Discord
[Section titled “Discord”](#discord)
Owners get an invite to the Throughline Discord right in the app: open **Settings** and click **Join the community** at the bottom. It’s a place to swap notes with other writers, get early looks at what’s coming, and help shape where Throughline goes next.
## Email
[Section titled “Email”](#email)
For a bug, a question, or anything you’d rather not put in Discord, reach the team at [support at peak-state.com](#).
## Reporting a bug
[Section titled “Reporting a bug”](#reporting-a-bug)
The more specific, the faster it gets fixed: what you were doing right before it happened, what you expected, and what actually happened. A screenshot helps more than a paragraph most of the time.
# Beat Cards
> The building block of your story: what a Beat Card holds and how it connects to everything else.
A Beat Card is a span of time in your story. In a screenplay, we recommend treating them like scenes. In a novel, they can represent chapters or even just important moments. In the Draft Workspace, you can order them by stacks and group them using Structure Cards. In the Shape Workspace, you can position them along emotional Arcs.
## What’s on a Beat
[Section titled “What’s on a Beat”](#whats-on-a-beat)
A single Beat holds:
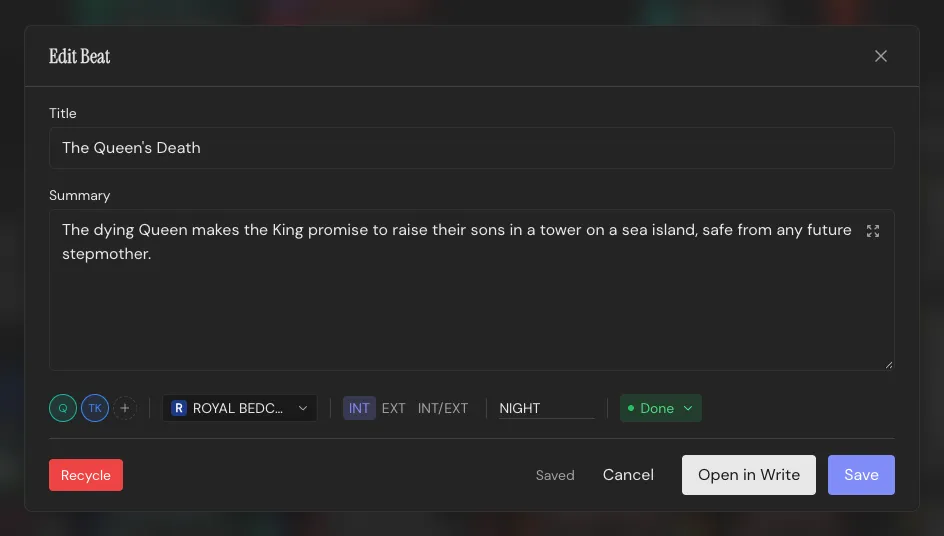
* **Title**
* **Summary**: a short single or multi-line text which is shown on the card.
* **Content**: the full text of your story, which can be seen and edited in the Write Workspace.
* **INT/EXT and time of day**, for scene-heading purposes
* **Status**: Draft, Done, or Don’t Print
Mark a Beat as “Don’t Print” and it’s skipped by most exports, without you having to delete it. Good for a scene that’s still too rough, or that you’re not sure survives the cut but aren’t ready to lose yet.
Beyond that, each Beat can be associated with:
* **Characters**: multiple Characters, shown as round chips
* **Setting**: one Setting, its colored “sleeve”
## Casting a Beat
[Section titled “Casting a Beat”](#casting-a-beat)
Characters and Settings live in their own rows above the Throughline in the Draft Workspace. Drag a Character Card or chip down onto a Beat and they’re associated with it; drag a Setting Card and it becomes the Beat’s Setting, visible as its colored sleeve. You can also manually enter Character names and Settings in the Beat dialog, or in the Beat’s top bar in the Write Workspace.
See [Characters](/docs/core-concepts/characters/) and [Settings](/docs/core-concepts/settings/) for what those cards hold.
## Stacking
[Section titled “Stacking”](#stacking)
Drop a Beat directly onto another Beat, or onto a Structure Card, and it stacks. Stacks can be expanded and collapsed with the control on the left of the Throughline in the Draft Workspace.
See [Structure Decks](/docs/core-concepts/structure-decks/) for the template side of that relationship, and [Draft](/docs/workspaces/draft/) for the full board.
# Characters
> Who your story happens to: what a Character Card holds, and how you cast one into a Beat.
Characters live in their own row above the Throughline in the Draft Workspace. Create a Character Card, then drag it or its chip down onto a Beat to cast it there.
## What’s on a Character
[Section titled “What’s on a Character”](#whats-on-a-character)
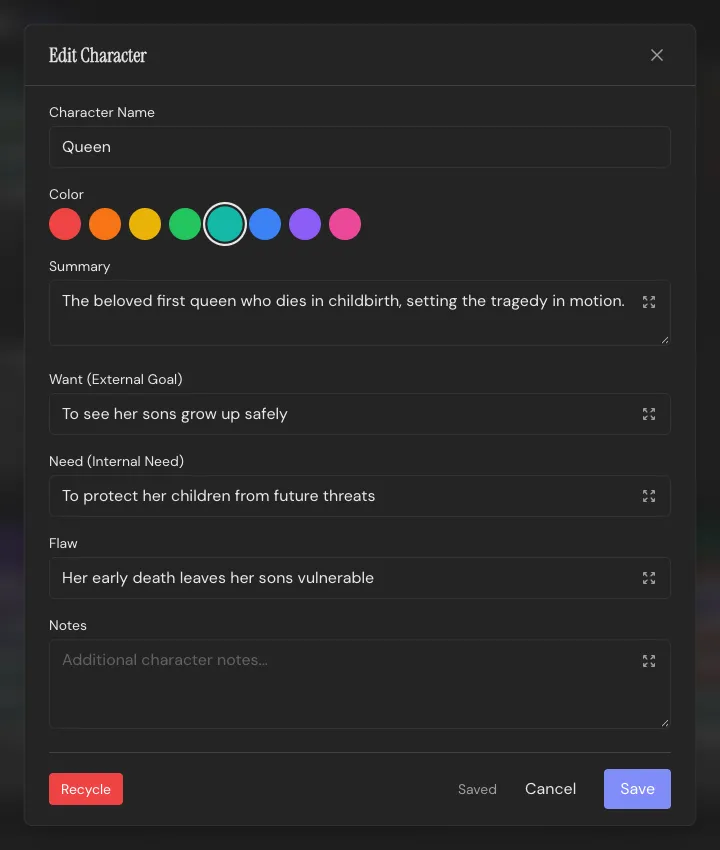
A Character Card holds:
* **Name**
* **Color**, which follows them everywhere: their chip, their dialogue highlighting in the Write Workspace, their node in the Shape Workspace’s Constellation
* **Summary**
* **Want, Need and Flaw**: what they’re chasing on the surface, what they actually require, and what’s preventing them from getting it
## Casting
[Section titled “Casting”](#casting)
Drag a Character’s chip onto a Beat and they’re in the cast for that scene. A Beat can hold as many Characters as you need. You can also enter Character names manually in the Beat dialog, or in the Beat’s top bar in the Write Workspace.
Characters aren’t locked to one Beat. Cast the same Character into every scene they appear in; the relationship is just a drag, so restructuring later costs nothing.
## In the Constellation
[Section titled “In the Constellation”](#in-the-constellation)
In the Shape Workspace’s Constellation, Characters are nodes you can connect to one another, with a relationship labelled in each direction. See [Shape](/docs/workspaces/shape/) for that side of it.
## In the script
[Section titled “In the script”](#in-the-script)
Character names autocomplete in the Write Workspace, and `(V.O.)` and `(O.S.)` cues stay attached to whichever Character they belong to. Rename a Character and Throughline offers to rename them throughout the script too, with a preview of how many scenes and lines are affected. See [Formatting & Elements](/docs/screenplay/formatting-and-elements/).
## Recycling
[Section titled “Recycling”](#recycling)
Drag a Character onto the recycling bin and it’s recycled, not gone. Open the bin and you can restore it exactly where it was.
# Settings
> Where your story happens: what a Setting Card holds, and how it sleeves a Beat.
Setting Cards represent locations in your story. They live in their own row above the Throughline in the Draft Workspace, alongside [Characters](/docs/core-concepts/characters/).
## What’s on a Setting
[Section titled “What’s on a Setting”](#whats-on-a-setting)
A Setting Card holds:
* **Title**
* **Color**, used to wrap Beats
* **Description**
## Casting
[Section titled “Casting”](#casting)
Drag a Setting Card onto a Beat and it becomes that Beat’s Setting, shown as a colored “sleeve” around the card. Unlike Characters, a Beat can only be associated with one Setting.
You can also pick a Setting in the Beat dialog, or in the Beat’s top bar in the Write Workspace.
## Grouping
[Section titled “Grouping”](#grouping)
Drop a Setting onto another to stack it there, for example every room of a palace in one pile.
Name them place first, then a dash and the room: “KING’S PALACE - GREAT HALL”. When cards in a pile are named after the place of the card on top, the pile shows that place once above it, and those cards show only their room. Hover a card to see its full title. Your titles stay as you wrote them, and scene headings and exports use them in full.
## In the script
[Section titled “In the script”](#in-the-script)
A Setting’s title feeds the location half of a scene heading, and stays linked. Change the Setting’s title later and the scene headings follow. See [Formatting & Elements](/docs/screenplay/formatting-and-elements/).
## Recycling
[Section titled “Recycling”](#recycling)
Drag a Setting onto the recycling bin and it’s recycled, not gone. Open the bin and you can restore it exactly where it was.
# Sparks Inbox
> Where a half-formed idea waits until it's ready to become a Beat, Character, or Setting.
Not every idea arrives ready to be a Beat, Character or Setting. A Spark is a scrap in your project’s inbox.
## Capturing one
[Section titled “Capturing one”](#capturing-one)
Open the Sparks inbox from the Draft Workspace sidebar, type, hit Enter. `Shift+Enter` gives you a line break if you need more than one line in a Spark. That’s it.
## Turning a Spark into a card
[Section titled “Turning a Spark into a card”](#turning-a-spark-into-a-card)
Drag a Spark onto any of the three rows and it becomes that kind of card:
* Onto the **Throughline** and it becomes a Beat
* Onto the **Character Row** and it becomes a Character
* Onto the **Setting Row** and it becomes a Setting
The Spark’s **first line becomes the new card’s name or title**, depending on the card type. The rest becomes summary or description.
Sparks reorder within the inbox by dragging, same as anything else, and you can pull an existing card back into a Spark by dropping it on the inbox’s drop zone, useful when an idea you promoted too early needs to go back to being just an idea.
Of course, Sparks don’t need to get promoted at all. Some just need to sit somewhere.
# Story Shapes
> Six classic emotional-arc curves you can lay over your own, right in the Shape Workspace.
Kurt Vonnegut argued that most stories follow one of a handful of emotional shapes. Story Shapes are those curves, built into the Shape Workspace as overlays to compare your own Arc against.
## The six shapes
[Section titled “The six shapes”](#the-six-shapes)
* **Man in Hole**: things get worse before they get better
* **Boy Meets Girl**: a rise, a fall, and a rise again
* **Cinderella**: steady rise, sudden drop, steady rise to a high
* **Tragedy**: a long, steady fall
* **Creation Story**: a flat, steady climb
* **Oedipus**: a fall, a partial rise, then a steeper fall
## Comparing your Arc
[Section titled “Comparing your Arc”](#comparing-your-arc)
In the [Shape Workspace](/docs/workspaces/shape/), toggle one or more shapes on top of your own Arc. You’ll see whether your middle actually sags the way it feels like it does, or whether your Tragedy is quietly turning into an Oedipus.
Toggle more than one at once to compare candidates, and clear the selection just as easily. The overlay is a reference line, not an edit; nothing about it changes your Arc.
Every Arc in your project gets its own shape comparison, since every plotline has its own emotional journey worth checking.
# Structure Decks
> Drag-and-drop story templates: four built in, plus your own.
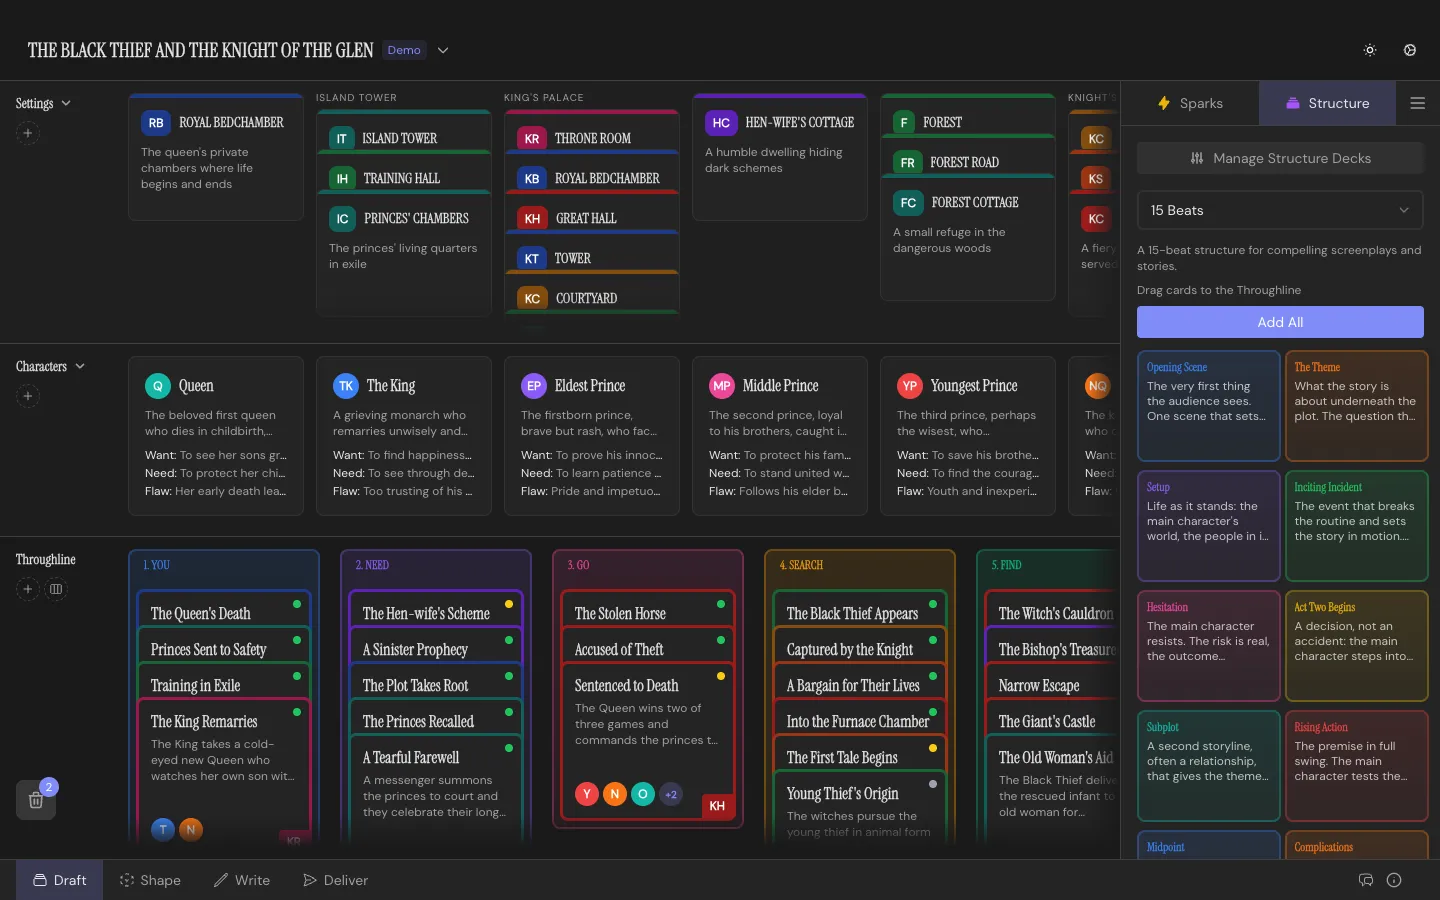
A Structure Deck is a named, ordered set of guidance cards. Drop them onto the Throughline as scaffolding, then stack your own Beats underneath. You don’t need to know story structure theory to use Throughline; that’s what decks are for.
## The four built-ins
[Section titled “The four built-ins”](#the-four-built-ins)
* **15 Beats**: 15 cards, for a compelling screenplay or story beat by beat
* **Hero’s Journey**: 12 cards, Joseph Campbell’s monomyth
* **Story Circle**: 8 cards, a character moving from comfort through change and back
* **Three-Act Structure**: 4 cards, the classic beginning, middle, and end
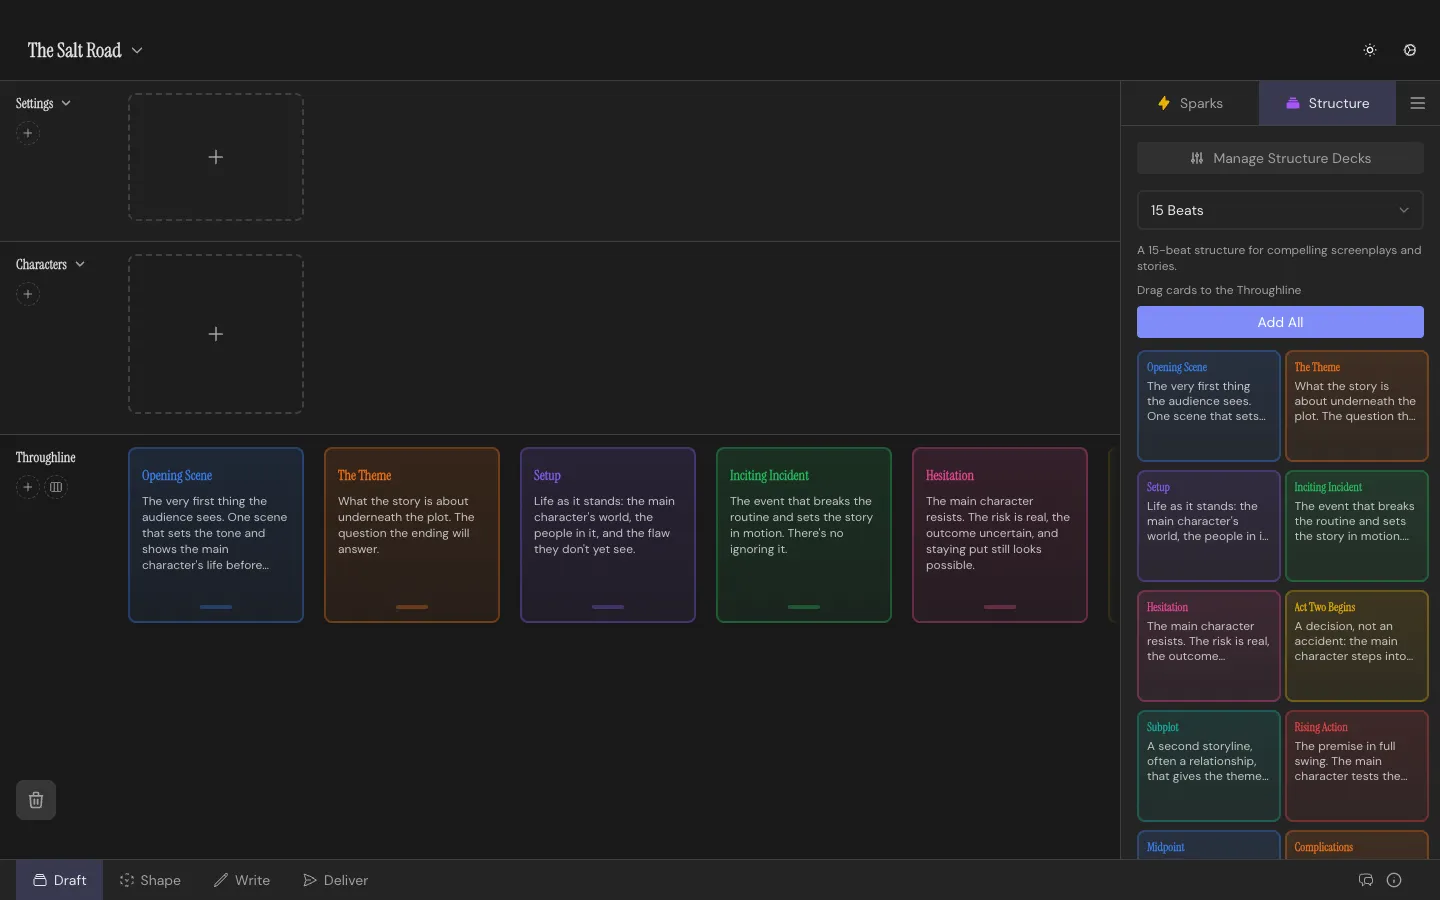
Open the deck panel from the Draft Workspace sidebar, pick one, then drag individual Structure Cards onto the Throughline or hit **Add All** to deal the whole deck at once.
## They’re yours once you place them
[Section titled “They’re yours once you place them”](#theyre-yours-once-you-place-them)
A placed Structure Card is a snapshot, not a live reference to the deck it came from. Edit its title, guidance text, or color and it just changes: no separate “override” step, no drift back to a shared template. Stack your own Beats underneath as you write toward fulfilling it.
## Editing and building decks
[Section titled “Editing and building decks”](#editing-and-building-decks)
Open the **Structure Deck Manager** from the Draft Workspace sidebar to see everything: your defaults, any custom decks, and the card count for each.
Edit a default deck and Throughline saves your changes as a personal override, badged “Modified”, without touching the original. Restore it to stock at any time. **+ New** gets you a blank deck to name and fill with your own cards, reordered however you like.
Decks export to a JSON file and import the same way, so a template you like can travel between projects, or come from someone else entirely.
# Themes
> Five built-in looks for Throughline, plus your own, all purely cosmetic.
Themes change how Throughline looks. No theme touches your story data, so switching around costs you nothing.
## The built-ins
[Section titled “The built-ins”](#the-built-ins)
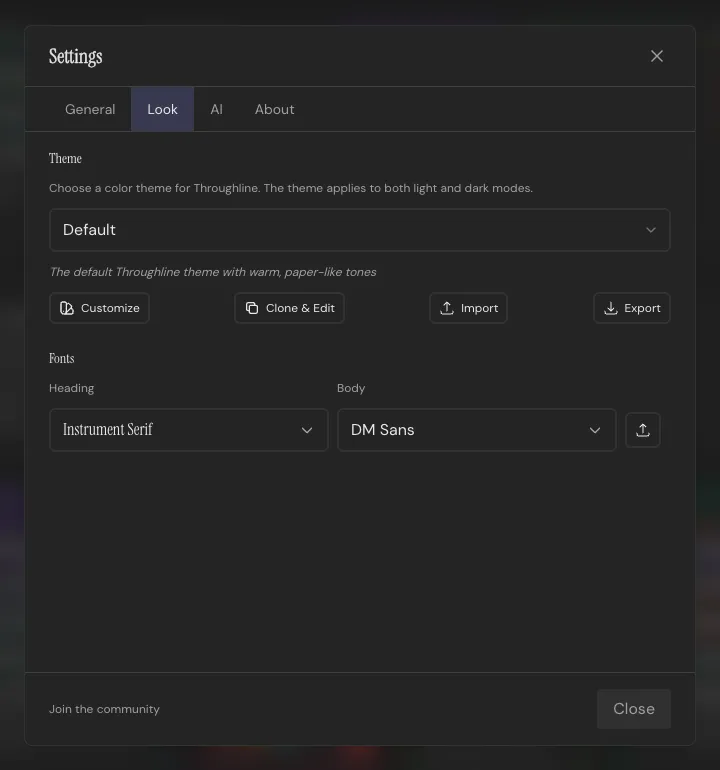
Bay, Default, Grayscale, Medieval, and Pumpkin ship with the app. Switch between them in **Settings → Look**. A separate light/dark toggle in the top bar applies to whichever theme you’re on.
## Making one your own
[Section titled “Making one your own”](#making-one-your-own)
Pick **Customize** on any theme to open a color-by-color editor: background, surface, accent, borders, all of it. **Clone & Edit** duplicates a theme as a new user theme first, so the built-in version stays intact underneath your changes.
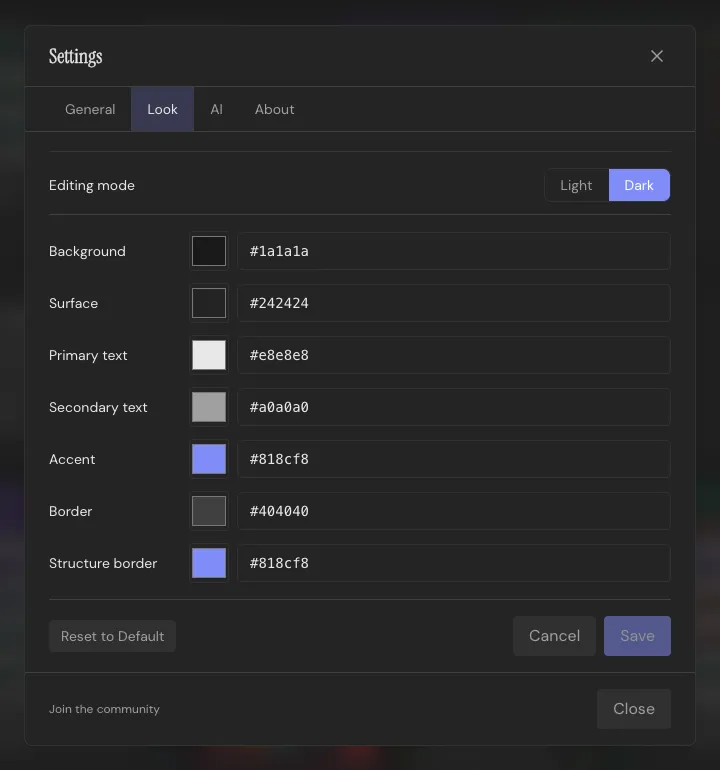
Themes export to a JSON file and import the same way. A theme missing a color or two still imports; Throughline fills the gaps from Default rather than refusing the file. Delete a custom theme and Throughline falls back to Default.
## Fonts
[Section titled “Fonts”](#fonts)
Heading and body fonts are separate pickers in the same panel, independent of theme. Import a custom font file (`.ttf`, `.otf`, `.woff`, `.woff2`) if you have one you’d rather write in.
**Reset Theme & Fonts** in Settings puts everything back to stock. Cosmetic only; your projects are untouched.
# Frequently Asked Questions
> Answers to the questions that come up most once you're actually using Throughline.
### Where does my data live?
[Section titled “Where does my data live?”](#where-does-my-data-live)
In files you own. Every project is a `.thrl` file saved wherever you choose, with its autosaves in a folder right next to it. There’s no account and no Throughline cloud. See [Projects & Files](/docs/getting-started/projects-and-files/) for the full picture.
### Does Throughline sync between devices?
[Section titled “Does Throughline sync between devices?”](#does-throughline-sync-between-devices)
No. Throughline has no cloud sync and no account to sign into. Each project is an ordinary `.thrl` file, so you can save, move, and copy it like any other document, and open it on any computer with Throughline installed.
### Does Throughline work without an internet connection?
[Section titled “Does Throughline work without an internet connection?”](#does-throughline-work-without-an-internet-connection)
Yes, fully, as soon as your License Key is activated. If you keep AI features deactivated, nothing about writing, planning, or exporting a project needs a connection at any point.
### How does the card system work?
[Section titled “How does the card system work?”](#how-does-the-card-system-work)
Your story’s spine is a row of Beat Cards. Characters and Settings sit above it, and you drag those down onto a Beat to cast it. Deal a Structure Card onto the board and stack your own Beats on top of it. A Beat can hold your actual prose or screenplay text, or just notes if you’re writing somewhere else. See [Beat Cards](/docs/core-concepts/beat-cards/).
### Is Throughline for screenwriters or novelists?
[Section titled “Is Throughline for screenwriters or novelists?”](#is-throughline-for-screenwriters-or-novelists)
Both. The Cards, Arcs, and Characters work the same regardless of what you’re writing, and the [Write Workspace](/docs/workspaces/write/) toggles between prose and screenplay formatting on the same document, with nothing to convert or re-import.
### Can I write and format a screenplay in Throughline?
[Section titled “Can I write and format a screenplay in Throughline?”](#can-i-write-and-format-a-screenplay-in-throughline)
Yes; see [Formatting & Elements](/docs/screenplay/formatting-and-elements/) for the full rundown. You can even important standard Screenplay formats like Fountain and `.fdx`!
### What file formats does Throughline support?
[Section titled “What file formats does Throughline support?”](#what-file-formats-does-throughline-support)
Throughline projects are `.thrl` files, which you open directly. Import: Fountain, Final Draft (`.fdx`), PDF, and Plain Text. Document export: Markdown, PDF, Plain Text, Word. Screenplay export: PDF and Fountain, plus `.thrl` project files. See [Importing](/docs/import-export/importing/) and [Exporting](/docs/import-export/exporting/) for the details on each.
### Where do I find my license key?
[Section titled “Where do I find my license key?”](#where-do-i-find-my-license-key)
In your Gumroad library at [app.gumroad.com/library](https://app.gumroad.com/library), at the top of the Throughline purchase page, and in your receipt email. See [License Keys](/docs/getting-started/license-keys/) for activation and troubleshooting.
### Does Throughline use AI?
[Section titled “Does Throughline use AI?”](#does-throughline-use-ai)
Only if you turn it on. The AI Assistant is off by default, and you bring your own provider: run Ollama locally and nothing ever leaves your machine, or point Throughline at an OpenAI-compatible endpoint with your own key. See [AI Assistant](/docs/ai-assistant/). You can also connect Claude Desktop or another AI app to the running app, also off by default: see [MCP: Connect AI Apps](/docs/connect-ai-apps/). [Throughline and AI](/docs/throughline-and-ai/) gives the full picture.
### Is there a Throughline community?
[Section titled “Is there a Throughline community?”](#is-there-a-throughline-community)
Yes, there’s a Discord for owners of the software. The invite lives in the app: open **Settings** and click **Join the community** at the bottom. See [Community & Feedback](/docs/community/) for that and the other ways to reach the team.
### Do I need to know story structure theory?
[Section titled “Do I need to know story structure theory?”](#do-i-need-to-know-story-structure-theory)
No. The most common structures and beat sheets are built in as [Structure Decks](/docs/core-concepts/structure-decks/), ready to drag onto the board. Build your own or import someone else’s if you outgrow the defaults.
### I’m running an alpha or beta build of Throughline. Is that safe to write in?
[Section titled “I’m running an alpha or beta build of Throughline. Is that safe to write in?”](#im-running-an-alpha-or-beta-build-of-throughline-is-that-safe-to-write-in)
Betas are close to release quality: your projects are `.thrl` files in a folder you choose, saved as you write, and autosaves run as always. Alphas are rougher. They keep their own settings and list of recent projects, but they open and save your real `.thrl` files, so try an alpha on copies of anything important (**Save a Copy…**).
One thing to know before going back to an older stable version: older versions keep projects inside the app rather than in files. To bring a project over, import its `.thrl` file there.
# Installation
> Get Throughline running on macOS or Windows.
Throughline runs natively on macOS and Windows. There’s no web account and no login. The app lives on your machine, and your work lives in `.thrl` files wherever you choose to keep them.
## Buy and download
[Section titled “Buy and download”](#buy-and-download)
Get Throughline at [shop.getthroughline.com](https://shop.getthroughline.com/). It’s a one-time purchase, no subscription. Your download link appears right after checkout, and again in your receipt email.
Your purchase also includes a license key; see [License Keys](/docs/getting-started/license-keys/) for where to find it and how to activate.
Pick the build for your platform:
* **macOS**: a `.dmg`. Open it, drag Throughline into Applications, done.
* **Windows**: an `.msi` installer. Run it and follow the prompts.
## First launch
[Section titled “First launch”](#first-launch)
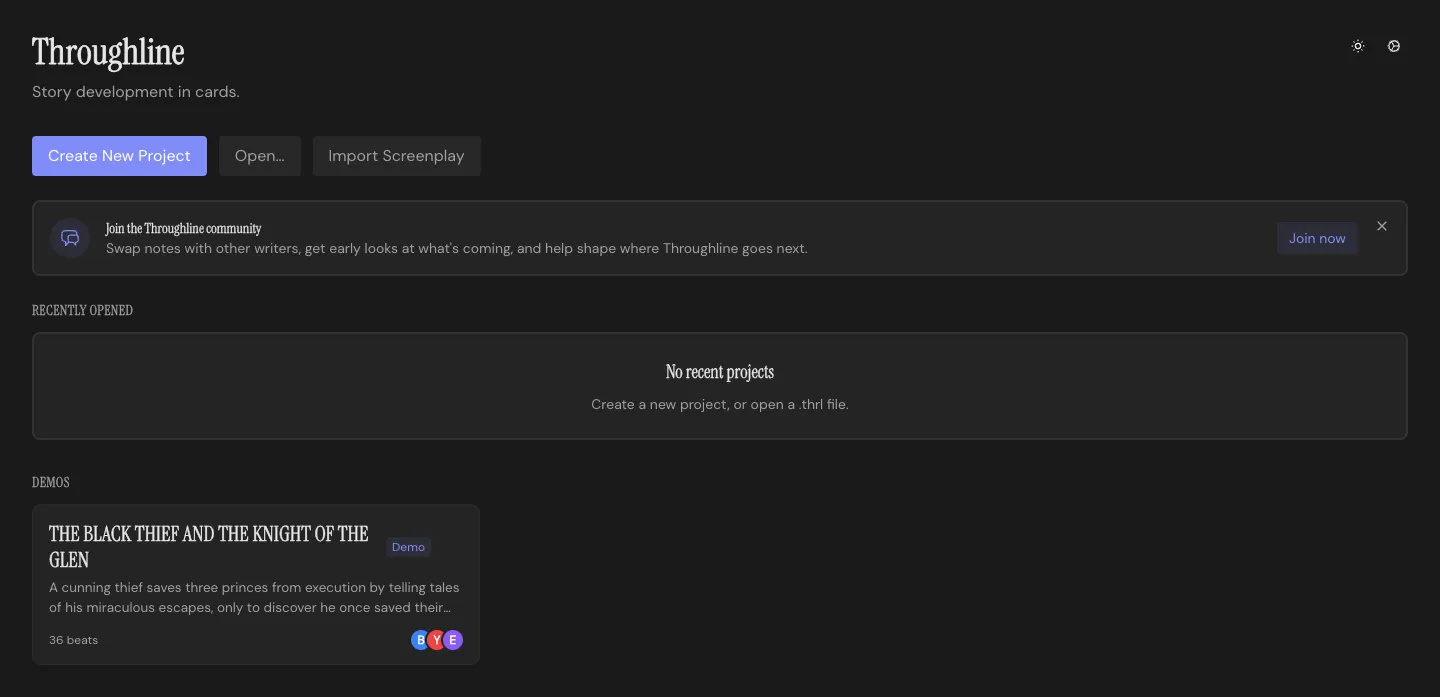
Throughline opens on the home screen, with the demo project ready to explore and room for your own story. From here you can create a new project, open a `.thrl` file, or import a screenplay; see [Quick Start](/docs/getting-started/quick-start/) for that first walk-through.
Coming from an earlier version of Throughline? On first launch, Throughline asks you to choose one folder for your existing projects and saves each of them there as a `.thrl` file. Nothing is deleted. See [Upgrading from an earlier Throughline](/docs/getting-started/projects-and-files/#upgrading-from-an-earlier-throughline).
Beta builds greet you with a short welcome note on first launch, and an occasional reminder after that: your projects are now `.thrl` files in a folder you choose, saved as you write, autosaves run as always, and the team wants to hear about anything that feels off. Alpha builds are rougher company. They open and save your real project files, so try them on copies of anything important.
## Getting updates
[Section titled “Getting updates”](#getting-updates)
Throughline checks for a new version when it launches. If one is out, you get a dialog telling you what’s new, with a Download button. Updates come from your Gumroad library, the same place you got the app.
# Interface Overview
> A labeled tour of Throughline's top bar, Workspace switcher, and Settings.
Every project opens into the same shell, whichever Workspace you’re in.
## The Workspace switcher
[Section titled “The Workspace switcher”](#the-workspace-switcher)
The tab bar along the bottom holds the four Workspaces: **Draft**, **Shape**, **Write**, and **Deliver**. Switch instantly, or use `Cmd/Ctrl+1` through `4`. Nothing exports or re-imports between them: it’s one project, four views of it. Each gets its own page under [Workspaces](/docs/workspaces/draft/).
## The top bar
[Section titled “The top bar”](#the-top-bar)
The top bar sits above whichever Workspace you’re in:
* **Project Details** (`Cmd/Ctrl+P`): title, logline, and author info, the material that ends up on a title page
* **Export** (`Cmd/Ctrl+E`): takes you straight to the Deliver Workspace
* **Undo and Redo** (`Cmd/Ctrl+Z`, `Shift+Cmd/Ctrl+Z`): the history stack covers the board, the Shape Workspace, and writing
Click the project title to open the project menu, which includes **Save a Copy…**, **Show in Finder** (on Windows, **Show in Explorer**), and **Restore from Autosave**. Your project saves to its file on its own, so a status shows up beside the title only when something needs your attention. See [Projects & Files](/docs/getting-started/projects-and-files/).
The gear icon opens **Settings**, with tabs for General (language, autosaves, license and reset options), Look (theme and fonts), AI, and About (version, licenses, privacy and legal notes). A light/dark toggle sits in the top bar on its own, separate from the theme picker in Settings, since it’s the one thing you’ll want to flip without digging through a menu.
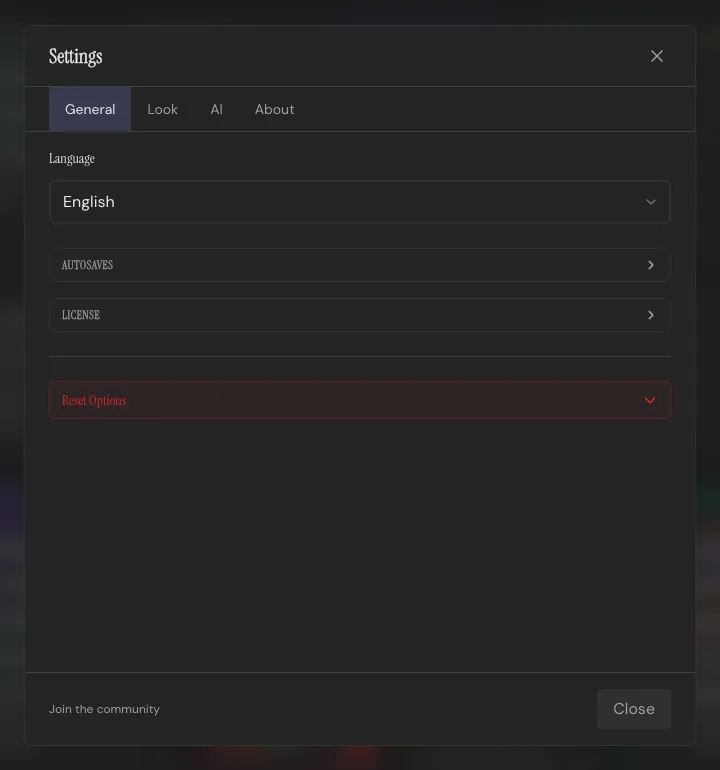
See [Themes](/docs/core-concepts/themes/) for the customization side of it.
## Getting help
[Section titled “Getting help”](#getting-help)
Press `?` anywhere in the app for the full keyboard shortcuts list. See [Keyboard Shortcuts](/docs/reference/keyboard-shortcuts/) for the complete table.
# License Keys
> Where to find your Throughline license key, how to activate this screenwriting software offline, and what happens to your projects if you don't.
Throughline is a one-time purchase from [shop.getthroughline.com](https://shop.getthroughline.com/). No subscription, no account to create. Every purchase comes with a license key, and keys were generated retroactively for everyone who bought before they existed, so yours is waiting even if you’ve owned the app for a while.
## Where to find your key
[Section titled “Where to find your key”](#where-to-find-your-key)
Open your Gumroad library at [app.gumroad.com/library](https://app.gumroad.com/library) and open Throughline. The key sits at the top of the purchase page. It’s also in your receipt email.
Keys look like this:
```plaintext
XXXXXXXX-XXXXXXXX-XXXXXXXX-XXXXXXXX
```
## Activating
[Section titled “Activating”](#activating)
Enter your key when the app asks for it, or any time under **Settings → General → License**. Activation needs a brief internet connection, once. After that, Throughline works fully independently of any Throughline servers.
A key covers a limited amount of activations to prevent piracy. Reinstalls count toward that, so if you run out, just email or reach out to a dev in the [Community](/docs/community/).
## Managing a device
[Section titled “Managing a device”](#managing-a-device)
**Settings → General → License** shows when you activated and a masked version of your key, plus a “Deactivate on this device” button. Deactivating removes the key from that machine only; it does not free up an activation on the key itself. If you need one back, that’s the support email again.
## Your projects are yours regardless
[Section titled “Your projects are yours regardless”](#your-projects-are-yours-regardless)
Your projects are `.thrl` files in folders you choose, and they stay yours with or without a license. Even if the free period lapses before you’ve entered a key, Throughline offers a one-click “back up all projects and show folder” that works offline, and autosaves keep running in the background. Unlike other expensive writing tools, **Throughline never holds your work hostage.**
## Troubleshooting
[Section titled “Troubleshooting”](#troubleshooting)
**“Key not recognized”**: almost always a typo. Copy it fresh from your Gumroad library or your receipt rather than retyping it.
**“Activation limit reached”**: you’ve used all activations, usually across reinstalls. Email for a reset.
**“Couldn’t reach the license server”**: check your connection and try again. Activation is the only step that needs one, so this won’t come back once you’re through it.
Keys from refunded purchases can’t be activated.
# Projects & Files
> Every Throughline project is a .thrl file you keep wherever you like: creating, opening, saving, and autosaves.
Every Throughline project is a `.thrl` file, saved wherever you choose: your Documents folder, an external drive, any folder you like. You can see it, move it, copy it, and send it like any other document.
There’s no account and no Throughline cloud. Your files go where you put them, and nowhere else.
## The home screen
[Section titled “The home screen”](#the-home-screen)
Throughline opens on the home screen. Under **Recently opened** you get a card for each of the six project files you opened most recently, showing where the file lives and when you last opened it. The top three also show their logline, cast, and beat count. Click a card to pick up where you left off.
Three buttons sit above the list:
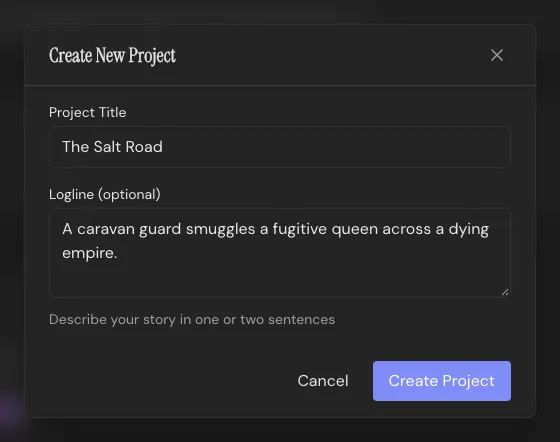
* **Create New Project**: asks for a title and, if you have one, a logline, then asks where to save the file.
* **Open…**: opens an existing `.thrl` file.
* **Import Screenplay**: brings in a Fountain, Final Draft, PDF, or plain text screenplay as a new project, then asks where to save it. See [Importing](/docs/import-export/importing/).
Below them, the **Demos** section holds the bundled demo project, ready to explore.
### The card menu
[Section titled “The card menu”](#the-card-menu)
Each card has a **⋮** menu:
* **Show in Finder** (on Windows, **Show in Explorer**): jumps to the file on disk.
* **Save a Copy…**: writes a copy of the project to a new file.
* **Remove from list**: takes the card off your home screen. The file itself is never touched.
The demo’s card has **Save a Copy…** and **Delete**. Save a copy of the demo if you’d like to keep building on it as your own project.
### When a file has moved
[Section titled “When a file has moved”](#when-a-file-has-moved)
If a project’s file was moved, renamed, or deleted outside Throughline, its card says “File not found. Click to locate it.” and offers two ways forward:
* **Locate…**: point Throughline at the file’s new place.
* **Save elsewhere…**: saves the project to a new file, so nothing is lost even if the original is gone.
## Opening a project
[Section titled “Opening a project”](#opening-a-project)
**Open…** (`Cmd+O` on macOS, `Ctrl+O` on Windows) opens a `.thrl` file itself, not a copy of it: everything you change is saved back to that file. You can also double-click a `.thrl` file in Finder or Explorer.
To work on a copy instead, open the project and use **Save a Copy…**.
## Saving
[Section titled “Saving”](#saving)
Throughline saves as you go. There’s no Save command to remember.
Most of the time you won’t see any save status at all. A message appears beside the project title only when something needs your attention:
* **“Couldn’t save, retrying”**: Throughline couldn’t write to the file for a moment and keeps trying.
* **“File not found”**: the file was moved or deleted while the project was open. Click **Save elsewhere…** to save it to a new location.
## File commands
[Section titled “File commands”](#file-commands)
On macOS these live in the **File** menu. On Windows the same shortcuts work with `Ctrl`.
| Command | Shortcut |
| ----------------------- | ------------------ |
| **New Project…** | `Cmd/Ctrl+N` |
| **Open…** | `Cmd/Ctrl+O` |
| **Save a Copy…** | `Shift+Cmd/Ctrl+S` |
| **Open Recent** (macOS) | |
| **Show in Finder** | |
Inside a project, click the project title in the top bar to open the project menu, which has **Save a Copy…**, **Show in Finder** (on Windows, **Show in Explorer**), and **Restore from Autosave**.
## Autosaves
[Section titled “Autosaves”](#autosaves)
On top of saving every change, Throughline keeps regular autosaves of your project in a folder named `_autosaves`, right next to your `.thrl` file. Pick how often they’re made and how many to keep in **Settings**.
Some copies are kept because of a decision you made, and those carry a label in their name, such as `(changed elsewhere)`, or `(legacy THRL 1.5)` for the original of a file updated from an older version. Those are never deleted automatically.
Every autosave is a normal `.thrl` file. Double-click one to open it as its own project, look around, and take what you need.
### Restoring an autosave
[Section titled “Restoring an autosave”](#restoring-an-autosave)
**Restore from Autosave**, in the project menu, lists the project’s autosaves, plus any backups made by earlier versions of Throughline. Restoring keeps your current state in the autosaves folder first, so a restore can always be undone.
## When a file changes elsewhere
[Section titled “When a file changes elsewhere”](#when-a-file-changes-elsewhere)
If the open project’s file is changed outside this window, for example on another computer, Throughline never swaps it in silently. A dialog, “This file was changed elsewhere”, explains what happened and offers three choices. Each one keeps both versions:
* **Load the changed file**: replaces what’s open with the file. What was open is kept in the autosaves folder.
* **Keep what’s open here**: saves what’s open over the file. The changed file is kept in the autosaves folder.
* **Keep both as separate files…**: saves what’s open as a new file, then loads the changed file in this window.
## Files from other versions of Throughline
[Section titled “Files from other versions of Throughline”](#files-from-other-versions-of-throughline)
* **Saved by a newer version**: Throughline asks before opening it, because editing it here may lose anything that uses newer features. Choose **Open Anyway**, **Update Throughline**, or **Cancel**.
* **Saved by an earlier version**: the file needs to be updated to open. This doesn’t change any of your content, and the original is kept in the autosaves folder, labelled with its format version, such as `(legacy THRL 1.5)`. Choose **Update** or **Cancel**.
## Using more than one computer
[Section titled “Using more than one computer”](#using-more-than-one-computer)
Throughline doesn’t sync anything itself, but a project file opens on any computer with Throughline installed. If you move your files between computers yourself, avoid editing the same project in two places at the same time. If it happens anyway, the [changed elsewhere](#when-a-file-changes-elsewhere) dialog keeps both versions.
## Upgrading from an earlier Throughline
[Section titled “Upgrading from an earlier Throughline”](#upgrading-from-an-earlier-throughline)
Earlier versions of Throughline kept projects in a library inside the app. The first time you launch this version, Throughline asks you to move them out: click **Export Projects…**, choose a folder, and each project is saved there as a `.thrl` file, including in a folder synced by Dropbox, Google Drive, or Syncthing. Your exported projects then wait for you under **Recently opened**. The demo stays built in.
# Quick Start
> Your first five minutes in Throughline: a project, a structure, and your first Beat.
The fastest way to get a feel for how Throughline works.
## Start from the demo, or start blank
[Section titled “Start from the demo, or start blank”](#start-from-the-demo-or-start-blank)
A demo project sits under **Demos** on the home screen the first time you open Throughline: a complete story with Beats, Characters, Settings, and Arcs already built out. Edit it all you like; leaving or reloading it resets it to the original, so there’s nothing to break.
When you’re ready for your own story, click **Create New Project** on the home screen. Give it a title and, if you have one, a logline, then choose where to save the project file. That’s it, you’re in. Already have a `.thrl` file? Click **Open…** instead. See [Projects & Files](/docs/getting-started/projects-and-files/) for everything the home screen can do.
## Drafting with Cards
[Section titled “Drafting with Cards”](#drafting-with-cards)
You’ll land in the **Draft** Workspace, looking at an empty Throughline.
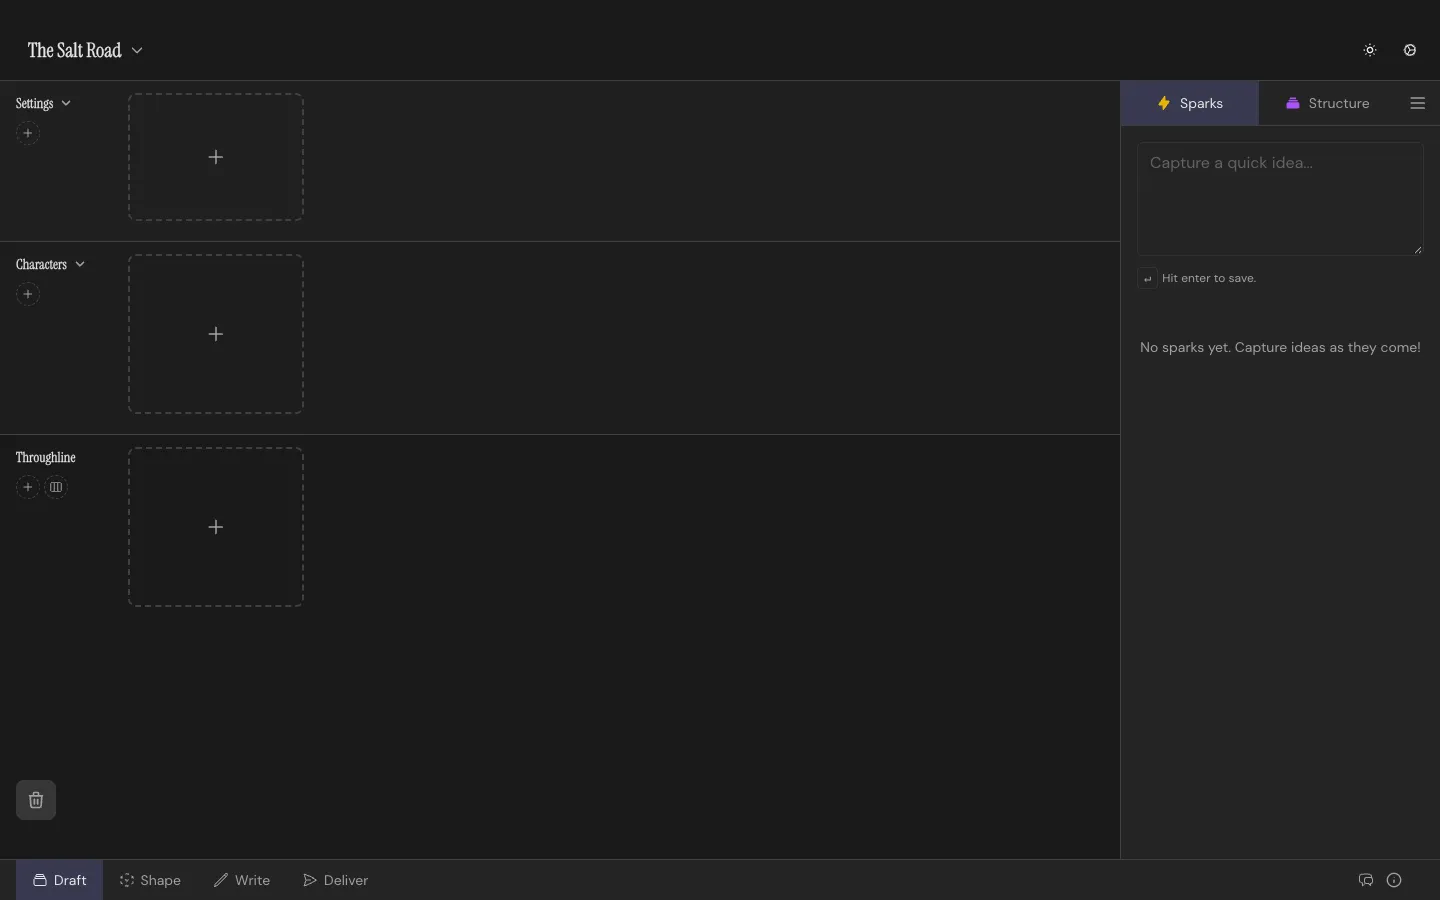
Open the Structure Decks panel on the right and pick a deck: 15 Beats, Hero’s Journey, Story Circle, and Three-Act Structure are built in. Drag a Structure Card onto the Throughline, or, our recommendation, hit **Add All** to deal the whole deck at once.
## Add a Beat, cast a Character
[Section titled “Add a Beat, cast a Character”](#add-a-beat-cast-a-character)
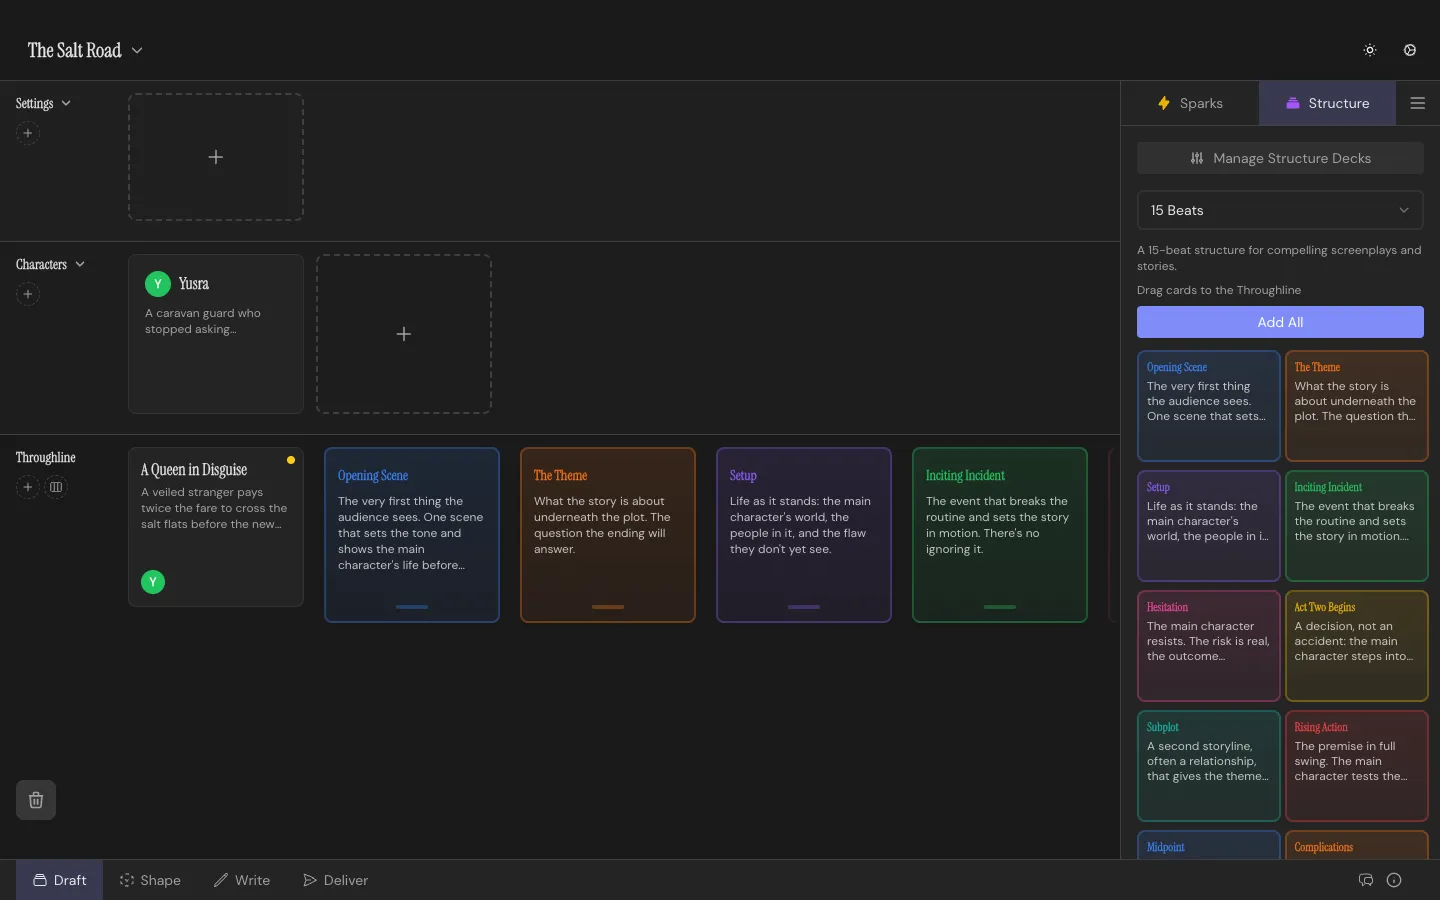
Press `N`, or click the Throughline’s `+`, to drop a blank Beat Card onto the strip. Stack it on a Structure Card or leave it free. Click into it to give it a title and summary.
Now add a Character: click the `+` in the Character Row above the Throughline, name them, then drag the round chip with their initials down onto your Beat. They’re now cast onto that Beat. Do the same with a Setting Card for wherever the Beat takes place, and you’ve got a Beat with a Character and a Setting!
## Switch Workspaces
[Section titled “Switch Workspaces”](#switch-workspaces)
Click through the tabs or hit the shortcut `Cmd/Ctrl+1` through `4` to cycle through the four workspaces: Draft, Shape, Write, Deliver. The Shape Workspace needs at least two Beats before it shows you anything interesting, so a full deck gives it plenty to work with.
From here: [Structure Decks](/docs/core-concepts/structure-decks/) for what else those decks can do, or [Draft](/docs/workspaces/draft/) for the full rundown of the board.
## Autosave
[Section titled “Autosave”](#autosave)
Everything saves to your project file as you go, so there’s no Save button to remember. A status appears beside the project title only if something needs your attention. See [Saving](/docs/getting-started/projects-and-files/#saving).
# Exporting
> Export an industry-standard screenplay as PDF or Fountain, a document as Markdown, Word, or PDF, or your full project as a .thrl file.
Everything you can export lives in the [Deliver Workspace](/docs/workspaces/deliver/), grouped by kind.
## Documents
[Section titled “Documents”](#documents)
* **Markdown**: for notes and sharing
* **PDF**: a print-ready document
* **Plain Text**: nothing but the words
* **Word**: formatted for Microsoft Word
## Screenplay
[Section titled “Screenplay”](#screenplay)
* **PDF**: a print-ready, industry-standard screenplay
* **Fountain**: plain-text screenplay format, for opening in another screenwriting app. Scene summaries come along as Fountain synopses, and Throughline reads them back when you import the file again.
There’s no `.fdx` export, because all that extra story data from your Throughline project has no place to go in Final Draft. Fountain is the industry-standard bridge if you need your pages in Final Draft or a similar tool; see [Migrating from Final Draft](/docs/migrating/from-final-draft/) if that’s where you’re headed.
## Project file
[Section titled “Project file”](#project-file)
A `.thrl` file: your full project, not a lesser export of it. Your project already lives in a `.thrl` file, so this is a quick way to hand someone a copy, just like **Save a Copy…** in the project menu. See [The .thrl File Format](/docs/file-format/) for what the format holds and how autosaves fit alongside it.
## Options and preview
[Section titled “Options and preview”](#options-and-preview)
Every format has its own advanced options: outline mode, included sections, numbering, page size, and more, all detailed in [Deliver](/docs/workspaces/deliver/). The preview pane updates live, so you see the real output before you commit to a file.
# Importing
> Open a .thrl project, or start a new one from a Final Draft, Fountain, PDF, or plain text screenplay.
Throughline reads five kinds of file: Fountain, Final Draft (`.fdx`), PDF, Plain Text, and its own `.thrl`.
## Opening a Throughline project
[Section titled “Opening a Throughline project”](#opening-a-throughline-project)
A `.thrl` file doesn’t need importing: it is your project. Click **Open…** on the home screen (`Cmd/Ctrl+O`), or double-click the file in Finder or Explorer, and Throughline opens the file itself, saving your changes back to it. If the file was last edited in a newer version of Throughline, you’ll see a warning before it opens. See [Projects & Files](/docs/getting-started/projects-and-files/) for more.
## Importing a screenplay as a new project
[Section titled “Importing a screenplay as a new project”](#importing-a-screenplay-as-a-new-project)
Click **Import Screenplay** on the home screen. Fountain, Final Draft, PDF, and plain text files come in as brand-new projects, not merged into an existing one, and Throughline asks where to save the new project file once the import is done. Because a screenplay is structured, Throughline pulls real data out of it automatically: scene headings become Beats, locations become Setting Cards, and Characters get extracted from dialogue.
German screenplay conventions are recognized too.
### Final Draft
[Section titled “Final Draft”](#final-draft)
`.fdx` files import directly, including scene headings, action, dialogue, parentheticals, transitions, scene numbers, scene summaries, and title page fields.
It isn’t lossless, and Throughline shows you the same list before it imports. What doesn’t come in:
* Script notes and inline notes
* Revision marks and revision colors
* Title page layout, draft date, and copyright
* Scene properties such as page length
* Locked pages, headers, and footers
* Shot and General paragraphs, which are kept as plain action lines
* Any formatting beyond bold, italic, and underline
### PDF
[Section titled “PDF”](#pdf)
PDF import uses heuristic detection to make sense of the layout, so results vary more than with a clean Fountain or Final Draft file. Give it a once-over after importing.
### What Throughline adds on top
[Section titled “What Throughline adds on top”](#what-throughline-adds-on-top)
A normal screenplay file carries the script and nothing else. Throughline’s cards hold more: a Want, a Need, and a Flaw on every Character, and a description on every Setting. No screenplay format has a place for any of that, so a fresh import leaves those fields open, ready to take your story deeper than the file it came from.
# Migrating from Arc Studio
> Bringing a project over from Arc Studio, and where each tool actually fits.
Arc Studio is built for writing with other people: real-time collaboration, cloud sync across Mac, Windows, iPad and the browser, revision management. Throughline is built for the opposite situation: working focussed by yourself, offline, without an account to manage. Know which one you’re solving for before you switch.
## Bringing a project in
[Section titled “Bringing a project in”](#bringing-a-project-in)
Export your script as Fountain from Arc Studio, then [import](/docs/import-export/importing/) it into Throughline as a new project. Once it’s in, your Characters and Settings have room Fountain never offered: a Want, a Need, and a Flaw on every Character, and a description on every Setting, waiting to be filled.
## What you get in Throughline
[Section titled “What you get in Throughline”](#what-you-get-in-throughline)
A development tool with a full screenplay editor attached, rather than a screenplay editor with outlining bolted on. Cast Characters and Settings onto Beat Cards, give every plotline its own emotional Arc with Poles you name yourself, overlay a classic [Story Shape](/docs/core-concepts/story-shapes/) to see how yours compares, and scrub a timeline to watch your cast’s relationships form and dissolve Beat by Beat. It’s a one-time purchase, and it runs the same whether you’re on a plane or at your desk.
## The trade-off
[Section titled “The trade-off”](#the-trade-off)
If you write in a room with other people, hand pages to a producer for live notes, or need your script open on an iPad, Arc Studio does things Throughline doesn’t: there’s no collaboration, no cloud sync, and no mobile app here. If you’re working alone and trying to find the shape of the story before you commit to writing it, that’s what Throughline was built for.
See the [full comparison](https://getthroughline.com/compare) for the rest.
# Migrating from Final Draft
> Bringing a Final Draft script into Throughline, and what to expect going the other way.
Final Draft is the industry default, and Throughline isn’t trying to replace it at the production end. Throughline is aimed at the part before that, where you’re still working out what the story is.
## Bringing a script in
[Section titled “Bringing a script in”](#bringing-a-script-in)
Throughline reads `.fdx` directly. [Import](/docs/import-export/importing/) the Final Draft file itself; there’s no Fountain export step in between. Scene headings become Beats, locations become Setting Cards, and Characters get pulled from your dialogue automatically.
It isn’t lossless. Script notes, revision marks, title page layout, and locked pages don’t survive the trip, and Throughline lists exactly what it will and won’t carry before you confirm. See [Importing](/docs/import-export/importing/) for the full list. We recommend starting your project in Throughline, so you can focus on your story, and then letting others handle Final Draft once a production team is involved.
## Going back out
[Section titled “Going back out”](#going-back-out)
Deliver a Screenplay PDF when you’re production-ready, or export Fountain and bring it into Final Draft to finish there. There’s no `.fdx` export; on the way out, the industry-standard and app-agnostic Fountain is the bridge.
## The tradeoff
[Section titled “The tradeoff”](#the-tradeoff)
Final Draft’s formatting is the reference implementation, and if you’re delivering into a pipeline that expects `.fdx`, that’s a real, practical advantage. What Throughline adds is the part before the script exists: Beat Cards you can cast and reorder, an emotional Arc for every plotline, and a map of how your cast’s relationships change scene to scene, plus a full screenplay editor to write the draft in once you know what it is.
See the [full comparison](https://getthroughline.com/compare) for a feature-by-feature breakdown.
# Migrating from Scrivener
> Scrivener organizes your manuscript. Throughline shows you its shape.
Scrivener is the best long-form organizer there is: a corkboard and binder for chapters and scenes, a place to keep research alongside the manuscript, and a compile step of real depth. Throughline is aimed at a narrower, earlier job: working out whether the story holds together before you commit a manuscript’s worth of pages to it.
## Bringing work in
[Section titled “Bringing work in”](#bringing-work-in)
There’s no direct Scrivener import. From Scrivener’s compile options, export your manuscript as Plain Text, or as Fountain if it’s screenplay-formatted, then [import](/docs/import-export/importing/) that file into Throughline as a new project. A PDF export works too, with Throughline’s heuristic detection finding what structure it can. Fountain or clean text comes across more reliably.
## The tradeoff
[Section titled “The tradeoff”](#the-tradeoff)
A Scrivener corkboard tells you the order of your scenes. It doesn’t tell you whether the middle sags, or how your protagonist’s relationship with the antagonist changes across the second act. That’s what Throughline’s [Arcs and Constellations](/docs/workspaces/shape/) are for. In exchange, you’re trading away Scrivener’s research binder and deep compile step, at least for now.
## They don’t have to be exclusive
[Section titled “They don’t have to be exclusive”](#they-dont-have-to-be-exclusive)
Writers can plan in Throughline, export, and finish the manuscript in Scrivener. Work out the shape first, then organize the long draft wherever you’re most comfortable.
See the [full comparison](https://getthroughline.com/compare) if you’re weighing the two.
# Glossary
> Throughline's own vocabulary, in one place.
**Arc**: A single plotline, tracked on its own curve in the [Shape Workspace](/docs/workspaces/shape/), between two named Poles.
**Beat**: A span of time in your story. See [Beat Cards](/docs/core-concepts/beat-cards/).
**Card**: Anything that sits on the board: a Beat, a Character, a Setting, or a Structure Card.
**Character**: Someone in your story, cast into Beats and mapped in the Constellation. See [Characters](/docs/core-concepts/characters/).
**Charge**: Where a Beat sits between its Arc’s two Poles. Its emotional position, dragged into place.
**Chip**: A Character or Setting’s small draggable representation, dropped onto a Beat to cast it.
**Constellation**: The Shape Workspace’s map of your cast and how they relate to one another.
**Dual Dialogue**: Two speeches printed side by side, for characters talking over each other. See [Formatting & Elements](/docs/screenplay/formatting-and-elements/).
**License Key**: The key from your purchase that activates Throughline on a device, once, over the internet. See [License Keys](/docs/getting-started/license-keys/).
**Pole**: One of two ends of an Arc’s emotional range. You name both yourself, e.g. “hope” and “despair”.
**Setting**: A location in your story. See [Settings](/docs/core-concepts/settings/).
**Spark**: A quick-capture idea in the project inbox, not yet promoted into a card. See [Sparks Inbox](/docs/core-concepts/sparks-inbox/).
**Stack**: Beats piled onto another Beat or a Structure Card. [Beat Cards](/docs/core-concepts/beat-cards/) and [Setting Cards](/docs/core-concepts/settings/) can both form stacks in the [Draft Workspace](/docs/workspaces/draft/).
**Structure Card**: A card from a [Structure Deck](/docs/core-concepts/structure-decks/), placed on the Throughline to organize Beat Cards..
**Throughline**: The main row of Beats, your story’s spine, in order.
**Workspace**: One of Throughline’s four rooms: Draft, Shape, Write, and Deliver.
**.thrl**: Throughline’s own project file format. See [The .thrl File Format](/docs/file-format/).
# Keyboard Shortcuts
> The full list, also available in-app any time by pressing ?
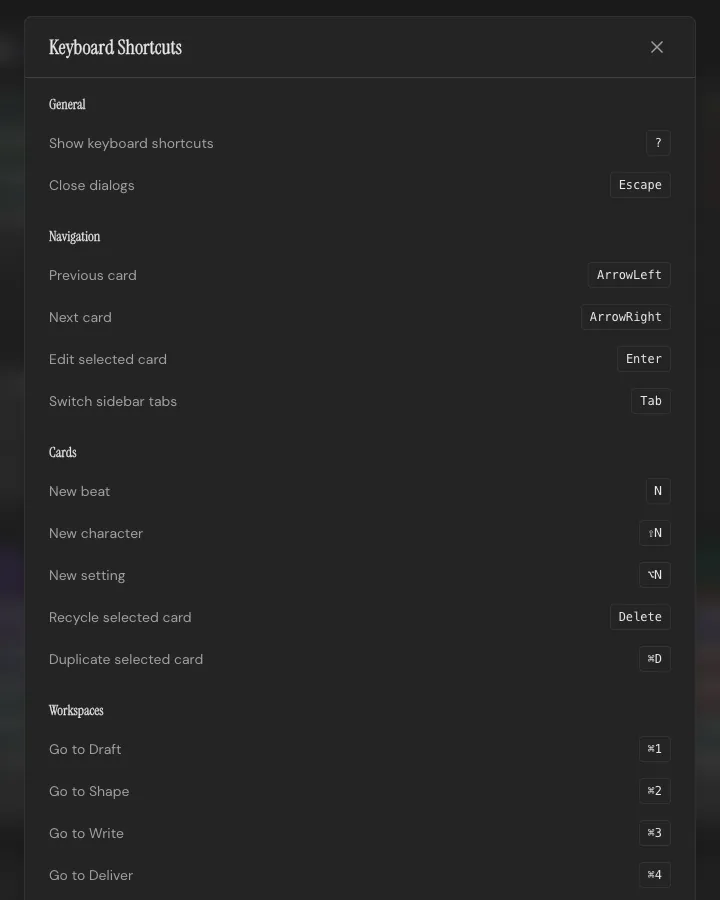
Press `?` anywhere in Throughline to pull this same list up on screen. `Cmd` on macOS, `Ctrl` on Windows.
## General
[Section titled “General”](#general)
| Shortcut | Action |
| -------- | ----------------------- |
| `?` | Show keyboard shortcuts |
| `Esc` | Close dialogs |
## Navigation
[Section titled “Navigation”](#navigation)
| Shortcut | Action |
| -------- | ------------------- |
| `←` | Previous Card |
| `→` | Next Card |
| `Enter` | Edit selected Card |
| `Tab` | Switch sidebar tabs |
## Cards
[Section titled “Cards”](#cards)
| Shortcut | Action |
| ------------ | ----------------------- |
| `N` | New Beat |
| `Shift+N` | New Character |
| `Alt+N` | New Setting |
| `Delete` | Recycle selected Card |
| `Cmd/Ctrl+D` | Duplicate selected Card |
## Workspaces
[Section titled “Workspaces”](#workspaces)
| Shortcut | Action |
| ------------ | ------------- |
| `Cmd/Ctrl+1` | Go to Draft |
| `Cmd/Ctrl+2` | Go to Shape |
| `Cmd/Ctrl+3` | Go to Write |
| `Cmd/Ctrl+4` | Go to Deliver |
## Project
[Section titled “Project”](#project)
| Shortcut | Action |
| ------------------ | ------------------- |
| `Cmd/Ctrl+N` | New project |
| `Cmd/Ctrl+O` | Open a project file |
| `Shift+Cmd/Ctrl+S` | Save a copy |
| `Cmd/Ctrl+E` | Export project |
| `Cmd/Ctrl+P` | Project details |
| `Cmd/Ctrl+Z` | Undo |
| `Shift+Cmd/Ctrl+Z` | Redo |
Projects save to their file automatically as you write. See [Projects & Files](/docs/getting-started/projects-and-files/).
## Editing
[Section titled “Editing”](#editing)
| Shortcut | Action |
| ------------ | ------------------ |
| `1` | Mark Beat as empty |
| `2` | Mark Beat as Draft |
| `3` | Mark Beat as Done |
| `Cmd/Ctrl+S` | Save changes |
| `Esc` | Cancel editing |
# Formatting & Elements
> Live, industry-standard screenplay formatting: how the six element types work in Write.
Screenplay mode formats as you type in the [Write Workspace](/docs/workspaces/write/).
## The six elements
[Section titled “The six elements”](#the-six-elements)
Scene Headings are treated with extra care in Throughline. You don’t type them on your page directly; they’re created intelligently based on Settings attached to your Beat in the toolbar at the top of the editor.
Action lines, Characters, Dialogues, Parentheticals and Transitions are exactly how you know them from other software. `Tab` cycles between them at your cursor, so you’re never reaching for a menu mid-sentence. Typing a character’s name automatically attaches that Character’s card to your Beat, or asks if you’d like to create a new one.
## Scene headings
[Section titled “Scene headings”](#scene-headings)
Built in the toolbar from three pieces: INT/EXT, a location, and a time of day.
## Character cues
[Section titled “Character cues”](#character-cues)
Type a name and Throughline autocompletes it from your project’s cast. `(V.O.)` and `(O.S.)` cues stay attached to whichever Character they belong to, so a voiceover line reads correctly wherever it shows up.
`(MORE)` and `(CONT'D)` are automatic. A dialogue block that runs across a page break gets them without you touching a thing.
## Dual dialogue
[Section titled “Dual dialogue”](#dual-dialogue)
Two people talking over each other get the classic two-column layout. Toggle it from the toolbar on a dialogue block and that speech prints beside the one before it.
It round-trips through Fountain, which marks dual dialogue with a `^`, and it renders in PDF export the way it looks on screen.
## Numbering
[Section titled “Numbering”](#numbering)
Scenes and dialogue lines can both auto-number. A new insertion between existing numbers gets a letter suffix: scene 42 gains a scene 42A rather than renumbering everything after it. You can also clear numbering entirely if you’d rather work without it.
Open the controls with the **#** button at the top of the Beat sidebar. Scenes and dialogue each have their own options: number them, number only the new ones, clear them, and choose whether the numbers print in PDF export.
Scene numbers show at the start of each row in the [Beat sidebar](/docs/workspaces/write/#the-beat-sidebar), where you can also change one by hand.
Only the active version of a Beat participates in numbering; see [Scene Versions](/docs/screenplay/scene-versions/) for what that means.
## Round-tripping through Fountain
[Section titled “Round-tripping through Fountain”](#round-tripping-through-fountain)
Fountain export carries your scene structure and dialogue faithfully, but it’s plain text: no dialogue numbers, and no room for the fields only Throughline has, like a Character’s Want, Need, and Flaw or a Setting’s description. Those live in your project and travel in `.thrl` exports. If you need numbered pages for production, export Screenplay PDF instead.
# Scene Versions
> Keep more than one take on a scene, and compare them side by side.
Some pieces of your writing need alternatives before you know which take is right. Versions let you do that.
## Branching a version
[Section titled “Branching a version”](#branching-a-version)
From any piece of text in a Beat in the [Write Workspace](/docs/workspaces/write/), look at the two buttons available in the sidebar:
* **Duplicate** branches a new version starting from what’s already on the page, so you don’t retype shared setup.
* **Start Fresh** begins a version with nothing in it, for when the two takes shouldn’t share any text.
## Comparing and switching
[Section titled “Comparing and switching”](#comparing-and-switching)
Pull up two versions side by side to see where they diverge, or switch the active version once you’ve decided which one’s staying. Delete a version you’ve ruled out.
## What “active” affects
[Section titled “What “active” affects”](#what-active-affects)
Only the active version of a Beat counts toward scene and dialogue numbering, and only the active version exports. The alternates sit there unnumbered and unexported until you make one of them active.
# Deliver
> Turn your project into a document or a screenplay, with a live preview of exactly what you'll get.
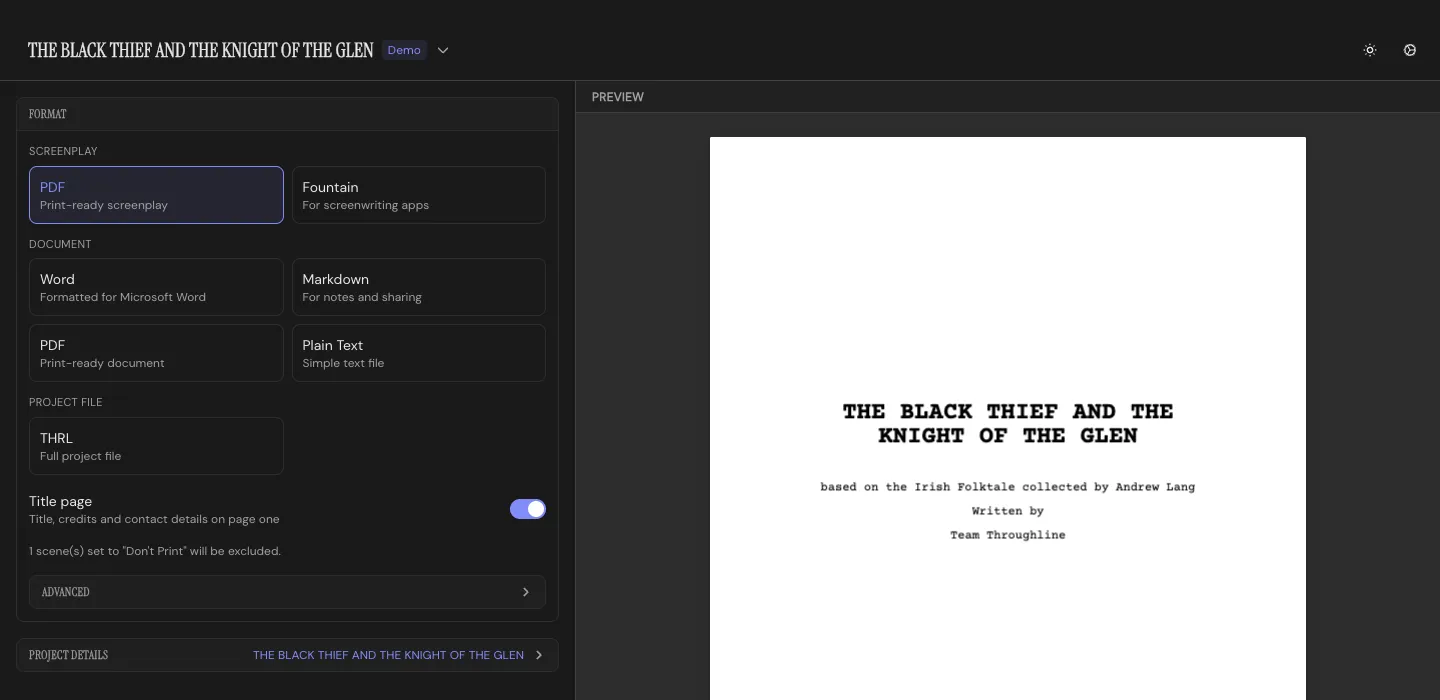
The Deliver Workspace has settings on one side and a live preview of the real output on the other. What you see in the preview is what you get.
## Picking a format
[Section titled “Picking a format”](#picking-a-format)
Every format sits at the top of the settings side, all at once, grouped by kind. Click one, or use the arrow keys to move between them:
* **Screenplay**: PDF, Fountain
* **Document**: Word, Markdown, PDF, Plain Text
* **Project file**: a full `.thrl` file with it all.
Right under the formats sits the switch you’ll reach for most:
* **Outline mode** for every document format: beat summaries instead of full text
* **Title page** for a screenplay PDF
Everything else is under **Advanced**, which opens below the formats, so you can still switch formats while it’s open:
* **All document formats**: outline mode (summaries instead of full text), toggles for including Character and Setting sections, Structure guidance, and Beat numbering
* **Markdown**: YAML front matter or formatted metadata, and scene headings or prose subheadings
* **Document PDF**: page numbers, page size, and page breaks before sections
* **Screenplay PDF**: title page, bold scene headings, dialogue highlighting by Character color, scene and dialogue numbers, and page size
Beats marked **Don’t Print** in the Draft or Write workspaces are skipped by every format.
## Project details
[Section titled “Project details”](#project-details)
Below the formats: title, logline, and author info (name, company, address, city, country, email, phone), plus a credit line (“Written by…”) and a source note (“Based on the novel by…”) if the project needs one. All of it feeds the title page on a screenplay export. The section stays folded, showing your title, until you open it. Open it from anywhere in the app with `Cmd/Ctrl+P`.
## Exporting a screenplay as a document
[Section titled “Exporting a screenplay as a document”](#exporting-a-screenplay-as-a-document)
Throughline warns you first: screenplay formatting doesn’t survive the trip to Markdown or Word, and you’ll lose the page layout. Switch straight to Screenplay PDF from that warning, or export anyway if that’s what you want.
## Getting it out
[Section titled “Getting it out”](#getting-it-out)
The Print and Export buttons stay at the bottom of the settings side, and the Export button names the format you picked. Copy straight to the clipboard, print natively on macOS, or export to a file. The preview regenerates as you change options, so you already know what you’re getting before you hit the button.
# Draft
> Lay your story out as a row of Beat Cards, and cast Characters and Settings into them.
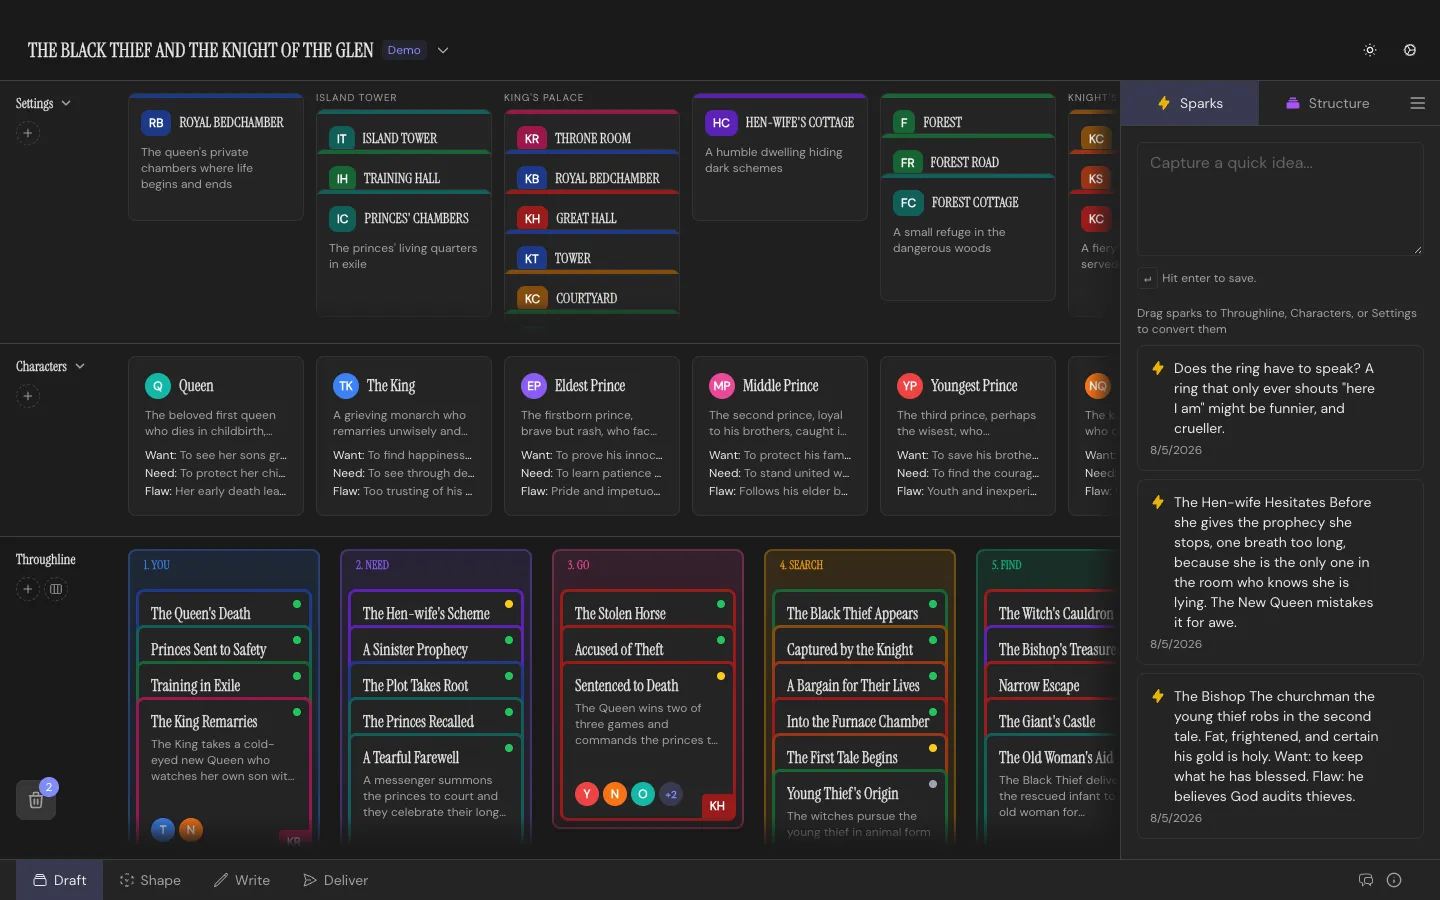
The Draft Workspace is your beat board. The Throughline is a row of Beat Cards; above it sit the Characters and Settings you cast into them.
## The board
[Section titled “The board”](#the-board)
Three rows, all drag-and-drop:
* **Setting Row**: where your story takes place
* **Character Row**: everyone in it
* **Throughline**: the spine, your Beats, in order
Drag a Character or Setting down onto a Beat to cast it there. Reorder Beats by dragging; the story reorders with them.
## Structuring as you go
[Section titled “Structuring as you go”](#structuring-as-you-go)
Open the right sidebar’s **Structure** tab to deal in a template: 15 Beats, Hero’s Journey, Story Circle, Three-Act, or one of your own. Drag a Structure Card onto the Throughline, or **Add All** to place a whole deck at once. Stack your own Beats underneath a Structure Card as you fulfill it, or under any other Beat if you just want a pile of alternates.
The **Sparks** tab holds ideas. Drag one onto any row to convert it into a card; see [Sparks Inbox](/docs/core-concepts/sparks-inbox/) for the conversion rules.
## Editing a card
[Section titled “Editing a card”](#editing-a-card)
Click any card to open its editor. The fields differ by type, covered in [Beat Cards](/docs/core-concepts/beat-cards/), [Characters](/docs/core-concepts/characters/), and [Settings](/docs/core-concepts/settings/).
## Nothing’s really gone
[Section titled “Nothing’s really gone”](#nothings-really-gone)
Drag any card onto the recycling bin to soft-delete it. Recycle a Stack and Throughline asks whether you mean the whole pile or just the card on top. Open the bin any time to see what’s been recycled and restore it exactly where it was.
## Shortcuts
[Section titled “Shortcuts”](#shortcuts)
`N` for a new Beat, `Shift+N` for a Character, `Alt+N` for a Setting. Each drops the card right where you’re looking, with no dialog in the way. The right sidebar collapses with its toggle button to give the Throughline full width.
# Shape
> See your story's emotional arc as a curve, and your cast as a living map of relationships.
The Shape Workspace is where emotional journeys live. It has two sections, switched from the tabs in the footer: **Arc** and **Constellation**.
## Arc
[Section titled “Arc”](#arc)
Every plotline can get its own Arc: the main plot, a B-story, a Character’s internal journey, a romance. Every project starts with one protected default Arc holding all Beats. Create as many more as you need.
An Arc has two Poles you name yourself (hope and despair, trusted and exposed, whatever fits) and Beats you drag up and down between them to chart the story’s **Charge**. Drag a Beat left or right to place it in time, and stretch its width to give it more room on the curve. Beats not yet on the active Arc wait in a ghost strip below the canvas; click one and it flies onto the timeline.
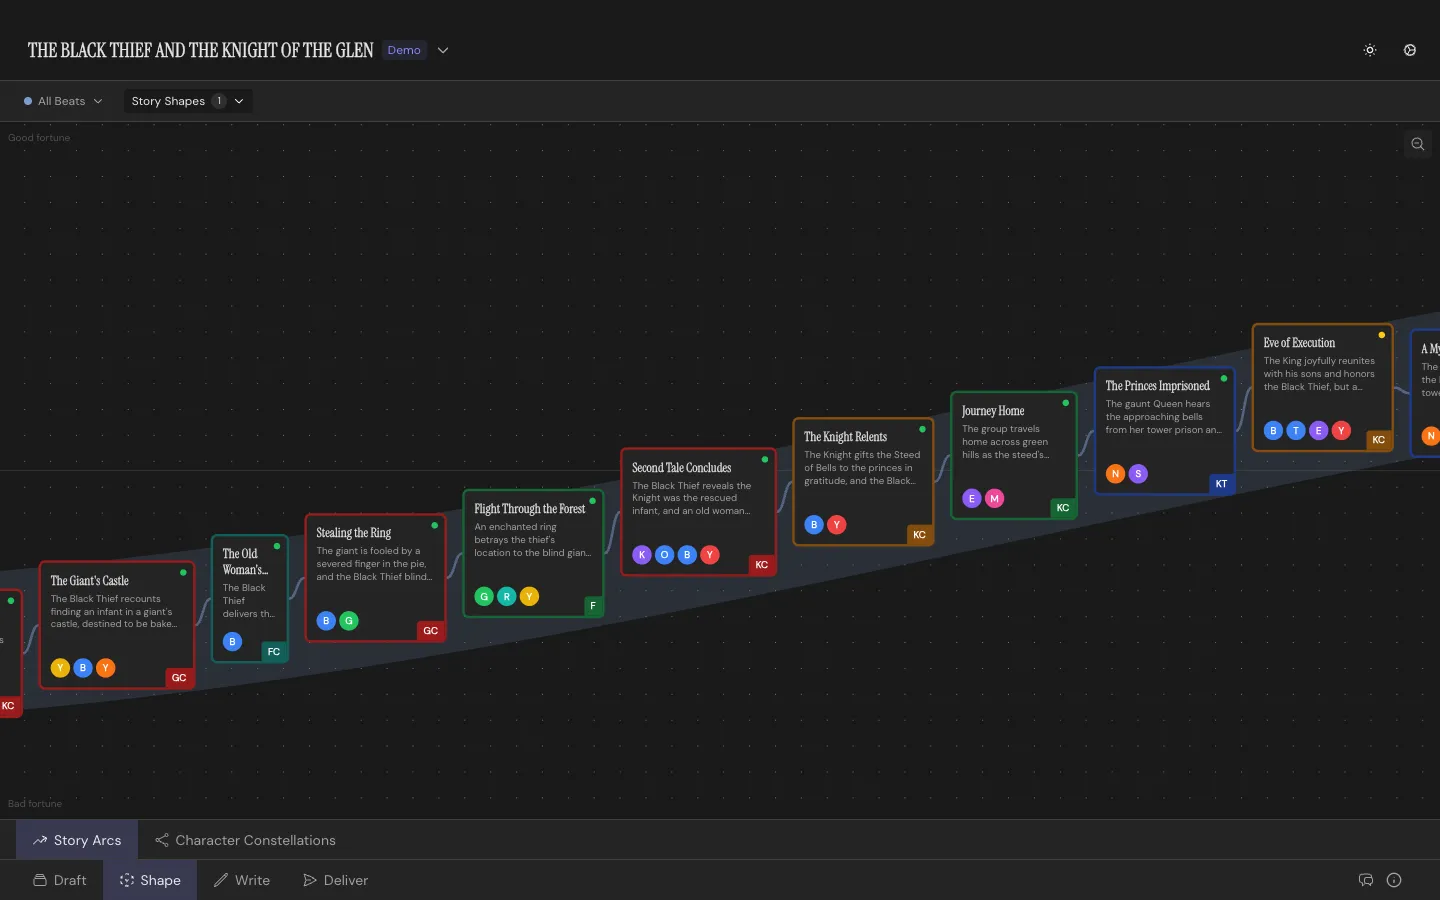
With at least two Beats charted, overlay a [Story Shape](/docs/core-concepts/story-shapes/) to compare your curve to the classics. You can seed a new Arc from specific Characters’ Beats rather than from all of them, useful when you’re isolating one relationship’s journey. **Reset Charges** clears every point on the Arc without deleting it.
## Constellation
[Section titled “Constellation”](#constellation)
Switch sections and your cast becomes a map: Characters as nodes, relationships as edges between them. Add a relationship between two Characters and label it in both directions; how A feels about B isn’t necessarily how B feels about A, so Throughline keeps those separate.
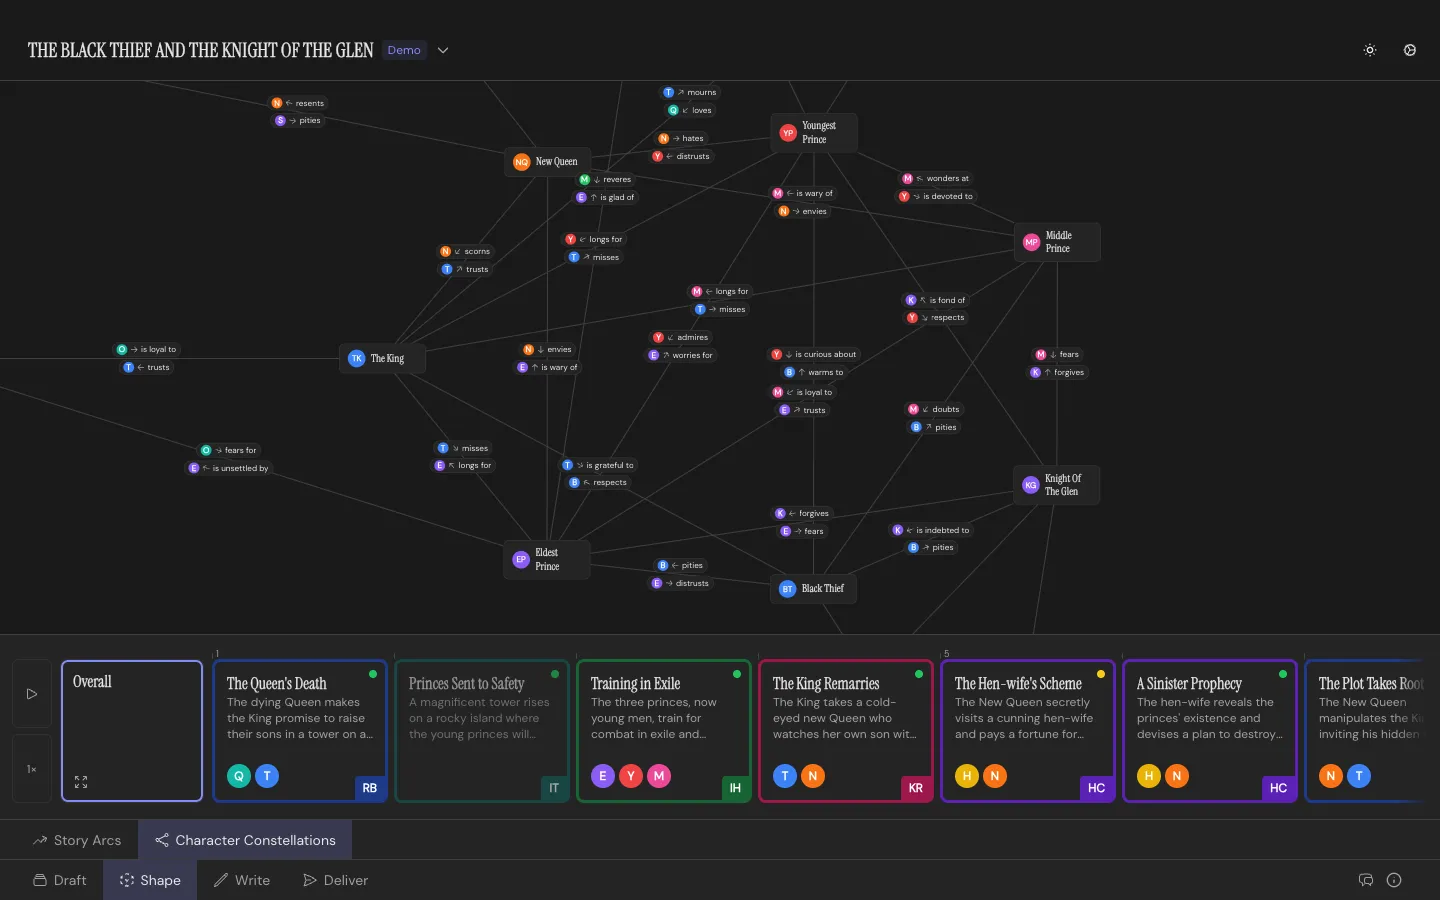
A relationship can start at a specific Beat and dissolve at a later one. The canvas has a play control: scrub through your story Beat by Beat and watch the map update as relationships form, shift, and break. Drag Characters around the canvas to reposition them, with per-Beat overrides if someone’s position should change as the story moves.
The Constellation needs at least two Characters before it shows you anything.
# Write
> A full screenplay and prose editor, bound to your Beats, with live industry-standard formatting.
The Write Workspace is where the actual text gets written.
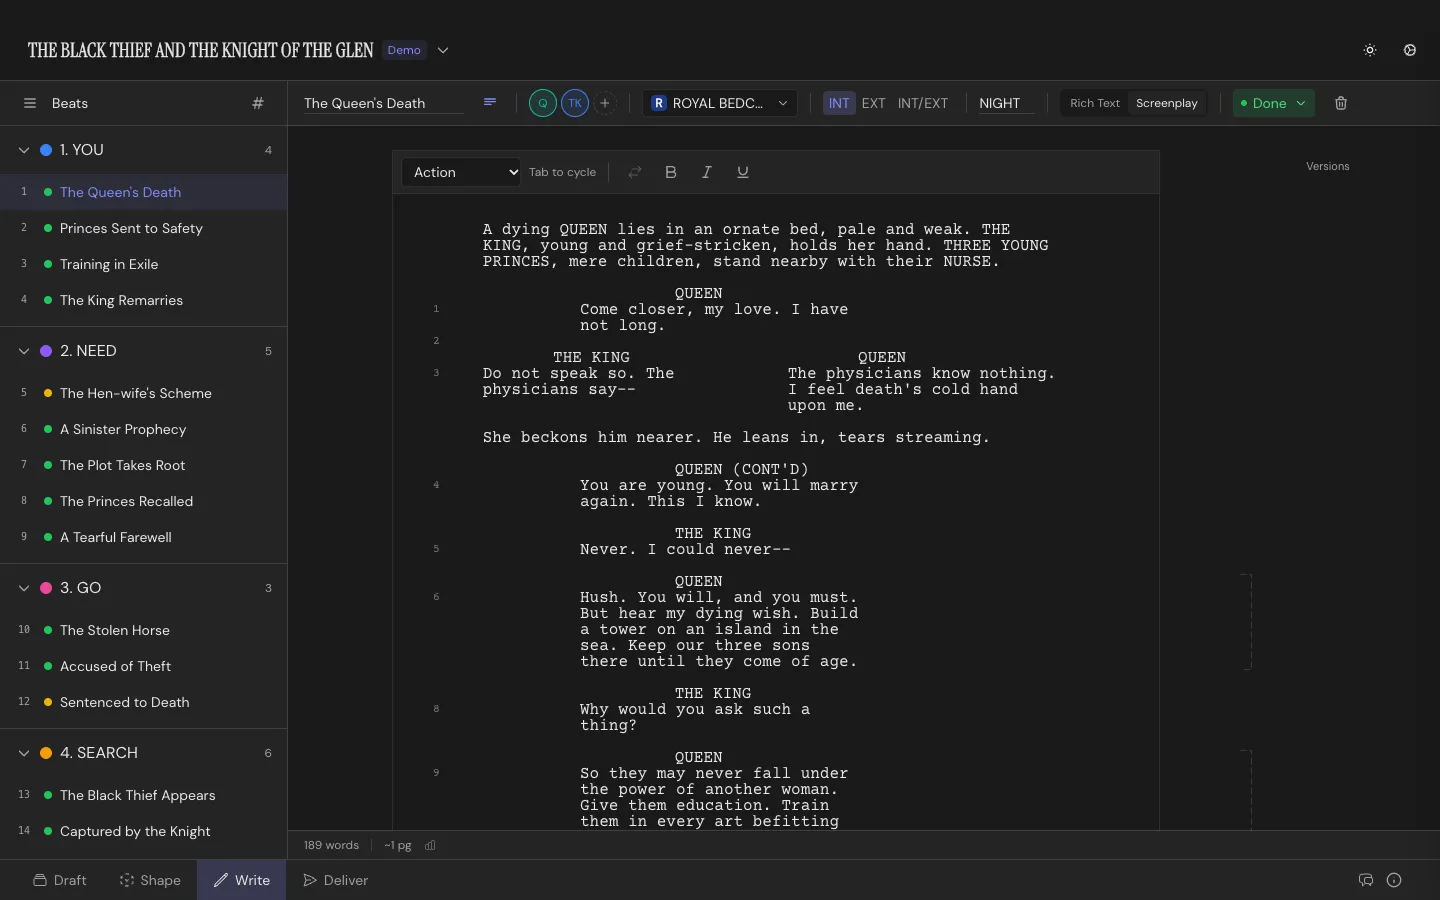
## Two modes, one document
[Section titled “Two modes, one document”](#two-modes-one-document)
Every project has a Rich Text mode and a Screenplay mode, toggled per project. Rich Text gets you bold, italic, and underline for prose. Screenplay mode gets you scene headings, action lines, character cues, dialogue, parentheticals, and transition elements, with `Tab` cycling between them as you type.
Scene headings build from INT/EXT plus a location and a time of day. Character names autocomplete from your project’s cast, and `(V.O.)` and `(O.S.)` cues stay linked to whichever Character they belong to. Scenes and dialogue can auto-number. See [Formatting & Elements](/docs/screenplay/formatting-and-elements/) for the full element reference.
## The Beat sidebar
[Section titled “The Beat sidebar”](#the-beat-sidebar)
A list of every Beat in the project, grouped under whatever Structure Card they’re stacked on. Click one to open it in the main editor, or add a new Beat right from the sidebar without leaving the Write Workspace.
Each row starts with a number. By default it’s the Beat’s place in story order, counted straight through from the first Beat to the last, across every Structure Card. It follows the story: move a Beat and the numbers update. AI apps you [connect to Throughline](/docs/connect-ai-apps/) use the same numbers, so “Beat 12” means the same Beat to you and to them.
Once you number your scenes, a Beat with a scene number shows that number in the row instead. Scene numbers stay fixed when you reorder, so after a move they can differ from the story order. See [Numbering](/docs/screenplay/formatting-and-elements/#numbering).
Hover a row and its number turns into a drag handle. Drag it to move the Beat in the story. To change a scene number by hand, click the handle and type the new one.
## The taskbar
[Section titled “The taskbar”](#the-taskbar)
Sits above the page for whichever Beat you’re on: title, Characters, Setting, INT/EXT and time of day, status, a short summary for the card back in Draft, and color. Create a new Character or Setting inline from here if the one you need doesn’t exist yet.
## Versions
[Section titled “Versions”](#versions)
Torn between two takes on a scene? Version it. **Duplicate** branches a new version from the current one; **Start Fresh** begins blank. Switch between versions, compare two side by side, or delete one you’ve decided against. Only the active version of a Beat is counted in scene and dialogue numbering. See [Scene Versions](/docs/screenplay/scene-versions/).
## Renaming a Character
[Section titled “Renaming a Character”](#renaming-a-character)
Rename a Character anywhere in Throughline and the Write Workspace offers to rename them everywhere they appear in the script too, cues and prose mentions both, with a preview of how many scenes and lines are affected before you commit.